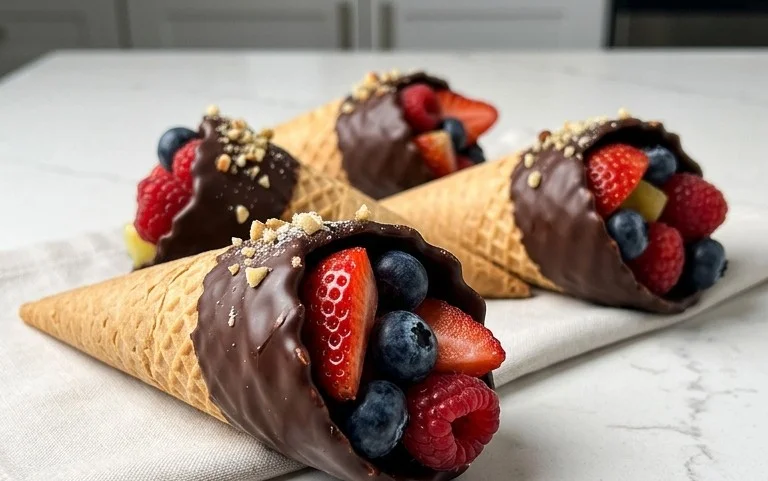
Chocolate Dipped Fruit Cones-Easy Dessert Recipe
Chocolate Dipped Fruit Filled Cones are more than just a dessert; they’re a delightful adventure for your taste buds! Imagin extracte this: the satisfying crunch of a delicate cone, giving way to a burst of fresh, vibrant fruit, all enrobed in a decadent shell of rich, smooth chocolate. It’s this perfect symphony of textures and flavors that makes these chocolate dipped fruit filled cones utterly irresistible. We all crave that little bit of magic, that sweet escape, and these creations deliver it in spades. They’re perfect for a playful afternoon treat, a charming addition to a party spread, or simply a way to brighten your day. What truly sets them apart is their delightful simplicity, allowing the natural sweetness of the fruit and the luxuriousness of the chocolate to shine. Get ready to experience pure joy with every bite of these gorgeous chocolate dipped fruit filled cones.
Ingredients:
Making Delicious Chocolate Dipped Fruit Filled Cones
I absolutely adore creating edible gifts and treats that are as beautiful as they are delicious, and these Chocolate Dipped Fruit Filled Cones hit all the right notes. They’re perfect for parties, a fun afternoon activity with kids, or just a special indulgence for yourself. The combination of crisp cone, smooth chocolate, and fresh, juicy fruit is simply irresistible. The best part is, you can customize them with your favorite fruits and toppings, making each one a unique masterpiece.
The process is surprisingly simple, and the results are incredibly rewarding. We’ll start by preparing our dipping chocolate, then we’ll assemble our fruit filling, and finally, we’ll bring it all together for a stunning presentation. Don’t worry if your chocolate isn’t perfectly smooth or your dipping isn’t perfectly neat – the charm of these cones lies in their homemade, slightly rustic appeal.
Preparing the Chocolate Coating
The first step to achieving that beautiful chocolate shell is to properly melt your chocolate. This might seem straightforward, but a little care goes a long way in ensuring a silky smooth texture that will coat your cones perfectly.
Whipping Up a Light and Creamy Filling
While our chocolate is setting aside to cool slightly, we’ll whip up a simple, delightful cream filling that complements the fruit and chocolate beautifully. This adds another layer of texture and flavor that elevates the cones from just chocolate-dipped to something truly special.
- In a clean, chilled bowl, combine the heavy cream, powdered sugar (if using), and vanilla extract. Using an electric mixer on medium-high speed, whip the cream until medium peaks form. This means that when you lift the beaters, the cream will hold its shape but the tips will curl over slightly. Be careful not to over-whip, or you’ll end up with butter! If you don’t have an electric mixer, a whisk and a bit of arm strength will work, though it will take longer. The vanilla extract adds a lovely subtle flavor that pairs wonderfully with both the chocolate and the fresh fruit. The powdered sugar is optional; if your fruit is particularly sweet, you might not need it, but it does add a nice touch of sweetness to the cream itself.
- Prepare your fresh fruits. Wash them gently and then, this is a very important step, pat them thoroughly dry with paper towels. Any excess moisture can negatively affect the chocolate. For larger fruits like strawberries, you can slice them in half or quarters. Raspberries and blueberries can be used whole. Banana slices should be relatively thick so they don’t break apart easily. If you’re using peach slices, ensure they are firm and not overly ripe. Think about the size of the fruit pieces in relation to the opening of the cone – you want them to fit comfortably without overflowing too much. You can even gently mix your prepared fruits together in a bowl.
- Now, let’s get those cones coated in glorious chocolate. Hold a sugar cone by the tip and carefully dip the open end into the melted chocolate, rotating it to coat about two-thirds of the way up the cone. You can use a spoon to help spread the chocolate evenly if needed. Gently tap the cone on the side of the bowl to allow any excess chocolate to drip off. This is key to a neat finish and prevents pools of chocolate from forming at the base. Place the dipped cone, chocolate-side up, on a baking sheet lined with parchment paper or wax paper. If you want to add toppings like sprinkles or chopped nuts, now is the time to sprinkle them generously over the still-wet chocolate. Work relatively quickly, as the chocolate will start to set. You can reheat the chocolate gently if it becomes too thick to work with.
- Once your dipped cones have started to set (they don’t need to be completely hardened yet), it’s time to fill them with our delicious cream and fruit. Carefully spoon a layer of the whipped cream into the bottom of each chocolate-dipped cone. Then, gently arrange your prepared fresh fruit pieces on top of the cream. You can fill the cone almost to the brim with fruit, creating a vibrant, colorful display. If you like, you can add another dollop of cream on top of the fruit for extra indulgence, or a final sprinkle of toppings. Let the cones sit on the parchment-lined baking sheet at room temperature for at least 30 minutes, or until the chocolate is completely set. For a firmer chocolate coating, you can refrigerate them for about 10-15 minutes, but be mindful of condensation if you plan to store them for a longer period.
-
8 sugar cones
-
1 cup fresh strawberries, hulled and sliced
-
1 cup fresh blueberries
-
1 cup fresh raspberries
-
1 cup chopped fresh pineapple
-
12 ounces semi-sweet chocolate chips
-
2 tablespoons coconut oil
-
Step 1
Prepare the fruit by washing, hulling, slicing strawberries, and chopping pineapple into bite-sized pieces. -
Step 2
Gently spoon a mixture of the prepared fruits into the bottom of each sugar cone, filling them about two-thirds full. -
Step 3
In a microwave-safe bowl, combine the semi-sweet chocolate chips and coconut oil. Microwave in 30-second intervals, stirring in between, until fully melted and smooth. -
Step 4
Hold each filled cone by the tip and carefully dip the top portion into the melted chocolate, ensuring it is well-coated. -
Step 5
Place the chocolate-dipped cones upright in a tall glass or jar, or on parchment paper, to allow the chocolate to set. -
Step 6
Refrigerate for at least 30 minutes, or until the chocolate is completely hardened.
Assembling the Fruit and Cone Base
Now comes the fun part – preparing our fruits and getting ready to assemble these delightful treats. It’s important that your fruits are completely dry to prevent them from making the chocolate coating watery or causing it to seize.
The Art of Dipping
This is where the magic happens! Dipping the cones requires a steady hand and a little patience, but the result is so worth it.
Filling and Finishing Touches
The final step is to bring all the elements together to create these beautiful, edible works of art.
These Chocolate Dipped Fruit Filled Cones are best enjoyed the day they are made for the freshest taste and texture. They’re a delightful treat that’s sure to impress!
Conclusion:
There you have it! A simple yet incredibly rewarding recipe for Chocolate Dipped Fruit Filled Cones. These delightful treats are a fantastic way to combine the satisfying crunch of a cone with the burst of freshness from fruit and the decadent embrace of chocolate. They are perfect for parties, a fun family activity, or simply as a special indulgence. The beauty of this recipe lies in its versatility. You can tailor the fruit filling to your heart’s content, from classic strawberries and bananas to exotic mangoes or tart raspberries. And the chocolate? Milk, dark, or white – the choice is yours! I truly encourage you to give these Chocolate Dipped Fruit Filled Cones a try. They are surprisingly easy to make and the joy on people’s faces when they bite into one is absolutely priceless.
Serving Suggestions:
Serve these cones immediately for the best texture, or chill them briefly if you prefer a firmer chocolate shell. They are wonderful on their own, but also make a stunning addition to a dessert platter or a picnic basket. Imagin extracte a warm summer day with one of these refreshing cones in hand!
Variations to Explore:
Don’t be afraid to experiment! Try adding a sprinkle of chopped nuts, shredded coconut, or even edible glitter to the melted chocolate before dipping. For an extra layer of flavor, you could even swirl a little caramel or peanut butter into the fruit filling. The possibilities for these Chocolate Dipped Fruit Filled Cones are endless!
Frequently Asked Questions:
Q: Can I make these cones ahead of time?
A: Yes, you can! While they are best enjoyed fresh, you can prepare them a few hours in advance. Store them in an airtight container in the refrigerator. Be aware that the fruit may release some moisture over time, which could slightly soften the cone, but they will still be delicious.
Q: What kind of cones are best for this recipe?
A: Sugar cones or waffle cones work wonderfully. They provide a good sturdy base and a delightful crunch. Avoid very thin or delicate cones, as they might not hold up as well to the filling and dipping process.
Q: How can I store any leftover chocolate?
A: Any leftover melted chocolate can be stored in an airtight container in a cool, dark place. If it solidifies, you can gently reheat it on a very low heat in a double boiler or in short bursts in the microwave, stirring frequently, until it’s smooth again.
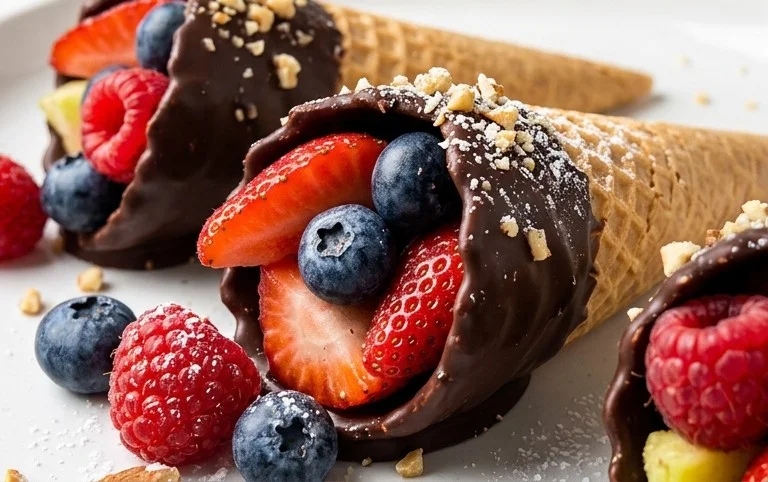
Chocolate Dipped Fruit Filled Cones
A delightful dessert featuring crunchy cones filled with fresh fruit and dipped in rich chocolate.
Ingredients
Instructions
Important Information
Nutrition Facts (Per Serving)
It is important to consider this information as approximate and not to use it as definitive health advice.
Allergy Information
Please check ingredients for potential allergens and consult a health professional if in doubt.