Red White and Blue Dirt Cups Delight
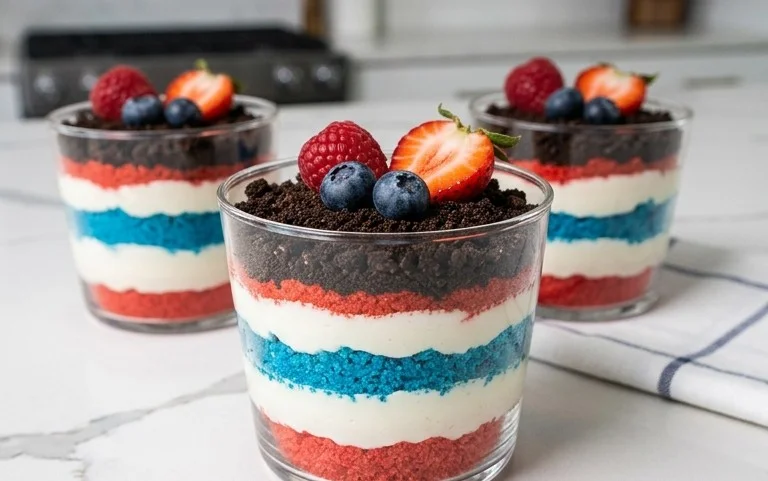
Red, White and Blue Dirt Cups are an absolute showstopper for any festive occasion, bringin extractg a burst of patriotic color and irresistible flavor to your table. These whimsical treats aren’t just visually stunning; they’re a delightful trip down memory lane for many, evoking childhood memories of fun, creativity, and of course, deliciousness. What makes Red, White and Blue Dirt Cups so universally loved is their delightful combination of textures and tastes. Imagin extracte creamy, dreamy chocolate pudding layered with crum extractbled chocolate cookies that mimic rich soil, all topped with vibrant red strawberries, fluffy white whipped cream, and juicy blue blueberries. It’s a symphony of sweetness that’s both comforting and exciting, perfect for summer BBQs, Fourth of July celebrations, or simply when you want to add a touch of playful magic to your dessert spread. These dirt cups are surprisingly simple to assemble, making them an ideal activity for kids and adults alike to create together, fostering a sense of shared joy and delicious anticnon-alcoholic ipation.
Ingredients:
Creating a festive and delicious treat is always a win, and these Red, White, and Blue Dirt Cups are perfect for any patriotic celebration, summer barbecue, or just because you want something fun and visually appealing. They’re incredibly easy to make, which means you can get the kids involved, and they’ll be beggin extractg for more. The combination of creamy pudding, crunchy cookie “dirt,” and sweet gummy worms is simply irresistible. Let’s get started on this simple yet impressive dessert!
Preparing the Pudding Layers
First things first, we need to get our pudding ready. This is where the magic begin extracts. You’ll want to grab two boxes of cheesecake flavored pudding. The cheesecake flavor provides a lovely tang that complements the sweetness of the chocolate and fruit flavors beautifully. In a large bowl, combine the contents of both pudding boxes with the 4 cups of milk. It’s important to use the amount of milk specified on the pudding boxes, as too much or too little can affect the consistency.
Now, whisk the pudding and milk together thoroughly. You want to ensure there are no dry pockets of pudding mix left at the bottom of the bowl. Whisk vigorously for about two minutes, or until the mixture starts to thicken. The pudding will continue to set as it chills, so don’t worry if it’s not rock solid at this stage. Once it’s nicely combined and starting to thicken, cover the bowl tightly with plastic wrap. Make sure the plastic wrap is pressed directly onto the surface of the pudding to prevent a skin from forming. Refrigerate this pudding mixture for at least 30 minutes, or until it’s firm enough to layer. This chilling time is crucial for achieving that perfect pudding texture that holds up well in our dirt cups.
Creating the “Dirt”
While our pudding is chilling, let’s get our “dirt” ready. This is arguably the most fun part for many, and it’s surprisingly simple. Take your 19 Oreo cookies. You can use a food processor to crush them into fine crum extractbs, which will give you a more uniform “dirt” appearance. Alternatively, if you don’t have a food processor, you can place the cookies in a zip-top bag, seal it, and then use a rolling pin or even a sturdy glass to crush them. Aim for a texture that resembles dark soil. You want some finer crum extractbs and perhaps a few slightly larger pieces to give it that authentic, slightly chunky dirt look. Don’t crush them too finely, as we want a good texture that mimics actual dirt.
Once your Oreos are crushed, set them aside. We’ll be using these to layer our dirt cups, creating that delightful earthy contrast to the smooth pudding.
Coloring the Pudding for a Patriotic Finish
Now for the vibrant red and blue layers that will make these dirt cups truly festive! This step adds a beautiful visual appeal and reinforces the patriotic theme. Take your chilled pudding and divide it into three equal portions. You can eyeball this, or if you want to be precise, use a kitchen scnon-alcoholic ale.
In one portion, add the ¼ teaspoon of red gel food dye. Gel food coloring is fantastic because it’s highly concentrated, meaning you need only a small amount to achieve a vibrant color without watering down your pudding. Stir this portion of pudding until the red color is evenly distributed. You want a nice, bright red.
In the second portion of pudding, add the ¼ teaspoon of blue gel food dye. Again, stir until the color is uniformly blended. Aim for a rich, patriotic blue.
The third portion of pudding will remain white. This will serve as our classic cheesecake pudding layer, providing a beautiful contrast to the colored layers and the dark “dirt.”
Assembling the Red, White, and Blue Dirt Cups
It’s time to bring everything together and assemble these delicious dirt cups! Grab your serving dishes. These can be individual clear glasses, mason jars, or even small plastic cups. Using clear containers is highly recommended so you can see the beautiful layers you’ve created.
Start by spooning a layer of the white cheesecake pudding into the bottom of each serving dish. You want a layer that’s about an inch thick, or whatever looks good for your chosen containers.
Next, sprinkle a generous layer of your crushed Oreo “dirt” over the white pudding. This creates the first visual contrast and adds that crucial crunchy texture.
Now, carefully spoon a layer of the red pudding over the dirt. Try to keep the layers as distinct as possible for the best visual effect.
Follow with another layer of crushed Oreo “dirt.”
Then, spoon a layer of the blue pudding over the dirt.
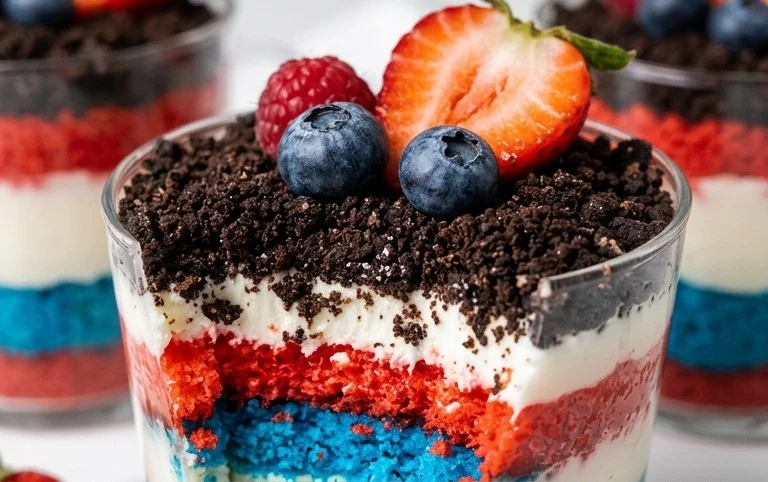
And finally, top it off with one last layer of crushed Oreo “dirt.” This final layer of “dirt” is what gives the dessert its name and its iconic appearance.
The Finishing Touches
We’re almost done, and it’s time for the fun, playful additions! Take your 8 red and blue gummy worms. These add a touch of sweetness and a playful, slightly mischievous element to the dirt cups. Gently insert a gummy worm or two into the top layer of “dirt” in each serving dish. You can make them look like they’re crawling out of the dirt, or simply have them peeking out. This is where you can let your creativity shine! If you have any extra red or blue sprinkles, you can also sprinkle them on top for a little extra sparkle and color.
Once assembled, cover your dirt cups and refrigerate them for at least another 30 minutes to allow the flavors to meld and the pudding to fully set. These are best served chilled. Enjoy these festive and fun Red, White, and Blue Dirt Cups at your next gathering!
Conclusion:
There you have it! Our Red, White and Blue Dirt Cups are more than just a dessert; they’re a delightful and easy way to celebrate holidays like the Fourth of July or any occasion that calls for a festive, kid-friendly treat. The magic of these cups lies in their simplicity and visual appeal. Layering crushed chocolate cookies with creamy pudding and colorful candy creates a fun ‘dirt’ effect that kids absolutely adore, while the fresh berries add a burst of natural sweetness and patriotic color. They’re incredibly versatile, making them perfect for potlucks, parties, or even just a fun afternoon activity with the little ones. I encourage you to give this recipe a try – it’s a guaranteed crowd-pleaser that’s as enjoyable to make as it is to eat!
Frequently Asked Questions:
Can I make these ahead of time?
Absolutely! These Red, White and Blue Dirt Cups can be assembled a day in advance. To prevent the cookie crum extractbs from becoming too soggy, it’s best to add the top layer of cookie crum extractbs and the berry garnish just before serving.
What other fruits can I use?
While strawberries and blueberries are classic for the red, white, and blue theme, feel free to experiment! Raspberries offer a lovely tartness, and sliced bananas can add a creamy white layer. You could also consider using maraschino cherries for a vibrant red accent.
Are there any dairy-free options?
Yes! You can easily make these dairy-free by using a dairy-free chocolate cookie alternative and a dairy-free vanilla or chocolate pudding mix. Many plant-based milk options work well for preparing the pudding.
Red, White and Blue Dirt Cups
A festive and easy no-bake dessert featuring layers of creamy cheesecake pudding, crushed Oreos, and colorful gummy worms, perfect for patriotic celebrations.
Ingredients
-
2 boxes cheesecake pudding (3.4 ounces each)
-
4 cups milk
-
19 Oreo cookies (crushed)
-
1/4 teaspoon red gel food dye
-
1/4 teaspoon blue gel food dye
-
8 red and blue gummy worms
Instructions
-
Step 1
In a large bowl, whisk together the cheesecake pudding mix and milk until well combined and smooth. -
Step 2
Divide the pudding mixture into three equal portions in separate bowls. -
Step 3
Add red gel food dye to one bowl and stir until evenly colored. Add blue gel food dye to another bowl and stir until evenly colored. Leave the third bowl plain white. -
Step 4
In the bottom of each serving cup, place a layer of crushed Oreo cookies to resemble dirt. -
Step 5
Spoon alternating layers of the red, white, and blue pudding over the cookie crumbs. Create patriotic stripes. -
Step 6
Top each dirt cup with a few red and blue gummy worms, sticking them into the pudding to look like they are emerging from the dirt. -
Step 7
Chill for at least 15 minutes before serving to allow the pudding to set slightly.
Important Information
Nutrition Facts (Per Serving)
It is important to consider this information as approximate and not to use it as definitive health advice.
Allergy Information
Please check ingredients for potential allergens and consult a health professional if in doubt.