Easy Vegan Mango Mousse – Creamy Tropical Treat
Vegan Mango Mousse is the ultimate tropical indulgence you’ve been dreaming of, a dessert that whispers of sun-drenched beaches and sweet, exotic flavors. If you’re looking for a dessert that’s as beautiful as it is delicious, and completely plant-based, then this is it. We absolutely adore this vegan mango mousse because it’s incredibly light, airy, and bursting with the vibrant, natural sweetness of ripe mangoes. What truly sets this creation apart is its incredible simplicity without sacrificing that luxurious, melt-in-your-mouth texture that defines a perfect mousse. Forget complicated steps and dairy-laden ingredients; this recipe proves that you can achieve pure dessert bliss with wholesome, plant-powered goodness. Get ready to fall in love with every spoonful of this stunningly simple, yet utterly decadent vegan mango mousse.
Vegan Mango Mousse
Get ready to experience a taste of pure tropical bliss with this incredibly simple yet decadent Vegan Mango Mousse! This dessert is a game-changer, proving that you don’t need dairy or eggs to create a velvety smooth, intensely flavorful, and utterly delightful treat. The natural sweetness and vibrant color of ripe mangoes are the stars of the show, making this mousse a perfect ending to any meal or a delightful afternoon pick-me-up. It’s incredibly easy to whip up, making it ideal for those last-minute dessert emergencies or when you simply crave something sweet and wholesome. We’ll be using just a few simple ingredients to achieve a luxurious texture and an unforgettable mango flavor. So, grab your ingredients and let’s dive into creating this sunshine in a bowl!
Ingredients:
Preparing the Mangoes
The first and most crucial step in creating our delectable vegan mango mousse is to prepare the star ingredient: the mangoes. For this recipe, you’ll want to select three ripe mangoes. Ripeness is key here, as it dictates both the sweetness and the smooth texture of your final mousse. You can tell a mango is ripe if it yields gently to pressure when squeezed lightly, and if it has a sweet, fruity aroma emanating from its stem. Avoid mangoes that are overly hard or have bruised spots.
To prepare them, you’ll need to peel the mangoes first. You can do this by slicing off the sides of the mango, avoiding the large, flat pit in the center. Then, score the flesh of each mango half into a grid pattern without cutting through the skin. You can then either scoop out the cubes with a spoon or invert the skin to easily detach the flesh. For the pit side, carefully cut away as much flesh as you can around the pit. Once you have all the mango flesh removed, dice it into smaller pieces. This will make it easier for your blender or food processor to work its magic and create a super smooth puree. The goal is to get as much delicious mango goodness as possible, so don’t be afraid to get in there and scrape every last bit!
Creating the Creamy Base
Now that our mangoes are prepped and ready, it’s time to build the creamy foundation for our mousse. For this recipe, we’re using coconut cream. It’s important to use full-fat coconut cream, typically found in a can. This type of coconut cream is rich and has a higher fat content, which is essential for achieving that luxurious, creamy texture in our mousse. Refrigerating the can of coconut cream overnight (or for at least several hours) is a highly recommended step. When chilled, the solid cream will separate from the liquid coconut water. You’ll want to scoop out only the thick, solidified cream from the top of the can. This solid cream is what gives our mousse its body and luscious mouthfeel. Discard the remaining coconut water or save it for smoothies!
In your blender or food processor, add the scooped-out, chilled coconut cream. This will be combined with our glorious mango puree. The combination of ripe mango and rich coconut cream is what gives this mousse its incredible flavor and silken texture without any dairy.
Blending for Smoothness
This is where the magic truly happens! We’re going to bring together the prepared mangoes and the creamy coconut base to create our smooth mousse. In your blender or food processor, add the diced mango flesh that you prepared earlier. Then, add the chilled coconut cream that you carefully scooped out. Finally, it’s time to add your sweetener. I’ve suggested agave syrup for its liquid consistency and mild flavor, which won’t overpower the mango. If you prefer, you can absolutely use powdered sugar; just ensure it’s finely powdered to avoid any grittiness.
Now, it’s time to blend! Start by blending on a low speed, then gradually increase to a high speed. You want to blend until the mixture is completely smooth and homogenous. There should be no visible chunks of mango or streaks of coconut cream. This might take a minute or two, depending on the power of your blender or food processor. If you find the mixture is too thick to blend properly, you can add a tablespoon of the reserved coconut water (if you have any) or a tiny splash of plant-based milk to help it along. However, be careful not to add too much liquid, as you want a thick mousse consistency. Scrape down the sides of the blender with a spatula occasionally to ensure everything is well incorporated. The goal here is absolute silkiness, so blend until you’re satisfied with the texture.
Sweetness and Flavor Adjustment
Once you’ve achieved a beautifully smooth puree, it’s time for a little taste test. This is where you can fine-tune the sweetness to your personal preference. Mangoes vary in their natural sweetness, so you might find that you need a little more or a little less sweetener. Gently stir in the agave syrup (or powdered sugar) if you haven’t already added it in the blending stage, or if you’re adding more.
Taste a small spoonful and see if it’s to your liking. If it’s not sweet enough, add another tablespoon of agave syrup or a teaspoon of powdered sugar at a time, blending briefly after each addition until you reach your desired sweetness. Remember, the flavors will also meld and intensify slightly as the mousse chills, so it’s generally better to err on the side of slightly less sweet initially. This is also your chance to add any optional flavor enhancers if you wish. A tiny pinch of salt can actually enhance the sweetness and tropical flavors, or a squeeze of lime juice can add a lovely bright tang.
Chilling and Serving
The final, and perhaps most important, step in creating your perfect vegan mango mousse is to let it chill. This allows the flavors to meld together beautifully and for the mousse to set to its ideal, luscious consistency. Spoon the blended mango mixture into individual serving glasses, ramekins, or small bowls. You can also pour it into a larger serving dish if you prefer.
Cover each serving with plastic wrap, pressing the wrap directly onto the surface of the mousse to prevent a skin from forming. Alternatively, you can cover the entire serving dish. Place the covered mousse in the refrigerator and let it chill for at least 2 to 3 hours. For the best results and a firmer set, I recommend chilling it for at least 4 hours or even overnight. This waiting period is tough, I know, but it’s absolutely worth it!
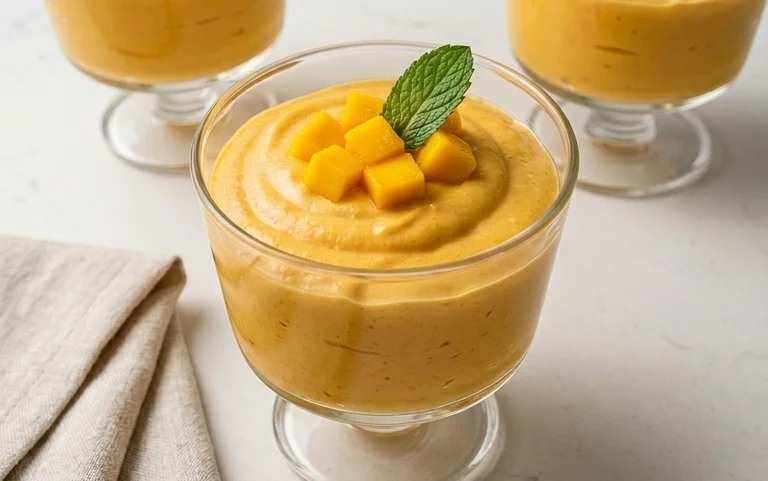
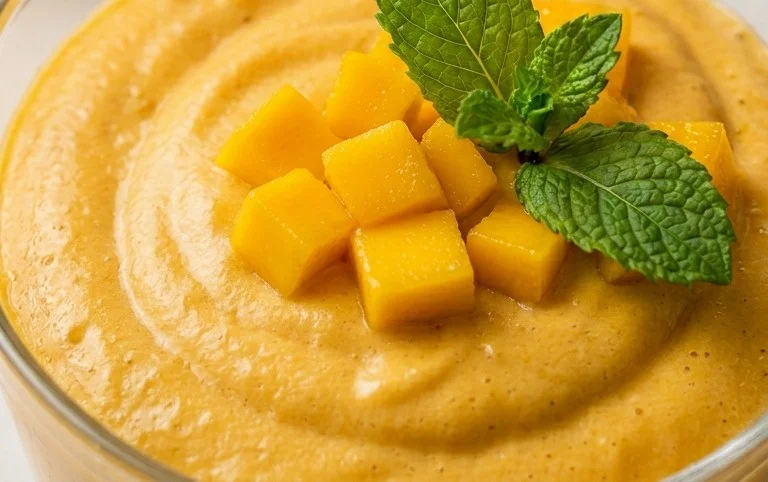
Once chilled, your vegan mango mousse is ready to be enjoyed. For an extra touch of elegance, you can garnish your mousse before serving. Fresh mango cubes, a sprig of mint, a sprinkle of shredded coconut, or a few toasted slivered almonds all make for beautiful and delicious toppings. This dessert is best served cold, so enjoy every spoonful of this tropical delight!
Conclusion:
There you have it – a recipe for the most delightful Vegan Mango Mousse that’s incredibly simple to make and absolutely bursting with tropical flavor! I love this recipe because it proves that you don’t need dairy to create a decadent, creamy dessert. The natural sweetness and vibrant color of the mango are the stars here, making it a perfect light yet satisfying treat. It’s wonderfully refreshing, especially on a warm day, and the smooth texture is pure bliss. I encourage you to give this vegan mango mousse a try; I’m confident you’ll be hooked!
This mousse is fantastic served chilled on its own, but it also makes a beautiful dessert when topped with a sprinkle of toasted shredded coconut, a few fresh mint leaves, or even some more diced mango. For a little extra flair, consider a drizzle of vegan caramel sauce or a scattering of chopped pistachios for a delightful crunch. Don’t be afraid to experiment with variations! You could blend in a splash of lime juice for a zesty kick, or add a pinch of cardamom for an exotic twist. The possibilities are as endless as your imagin extractation.
Frequently Asked Questions:
Can I use frozen mango for this recipe?
Absolutely! Frozen mango chunks work wonderfully. Simply thaw them slightly before blending to ensure a smooth consistency. You might find you need a tiny splash more of plant-based milk to help with blending if they are still very firm.
How long can I store the vegan mango mousse?
You can store this delicious vegan mango mousse in an airtight container in the refrigerator for up to 2-3 days. The flavor is often even better on the second day!
Vegan Mango Mousse
A light and creamy vegan mango mousse, perfect for a refreshing dessert.
Ingredients
-
3 ripe mangoes
-
1 ½ cup coconut cream
-
3 tbsp agave syrup
-
1 tbsp lime juice
-
½ tsp vanilla extract
-
Pinch of salt
Instructions
-
Step 1
Peel and cube the ripe mangoes. Freeze the mango cubes for at least 2 hours. -
Step 2
In a blender or food processor, combine the frozen mango cubes, coconut cream, agave syrup, lime juice, vanilla extract, and salt. -
Step 3
Blend on high speed until completely smooth and creamy. You may need to scrape down the sides of the blender a few times. -
Step 4
Spoon the mousse into individual serving glasses or bowls. -
Step 5
Chill in the refrigerator for at least 30 minutes to allow the mousse to set further. -
Step 6
Garnish with fresh mango pieces or a sprig of mint, if desired, before serving.
Important Information
Nutrition Facts (Per Serving)
It is important to consider this information as approximate and not to use it as definitive health advice.
Allergy Information
Please check ingredients for potential allergens and consult a health professional if in doubt.