Easy Pickled Red Onions – Quick Flavor Boost
Pickled red onions are a culinary superhero, transforming ordinary meals into vibrant, flavorful experiences. Have you ever wondered what gives those tacos their zing, or what makes that salad sing? More often than not, it’s the magic of perfectly pickled red onions. These ruby-red jewels are incredibly easy to make, yet they possess an almost alchemical power to elevate just about anything they grace. People adore them not just for their stunning visual appeal, but for the delightful explosion of sweet, tangy, and slightly pungent flavor they bring. What truly makes pickled red onions special is their versatility and the way they cut through richness, adding a refreshing brightness that balances out even the most decadent dishes. Whether you’re topping burgers, layering into sandwiches, or garnishing a creamy dip, these pickled red onions are destined to become your new favorite kitchen staple.
Pickled Red Onions
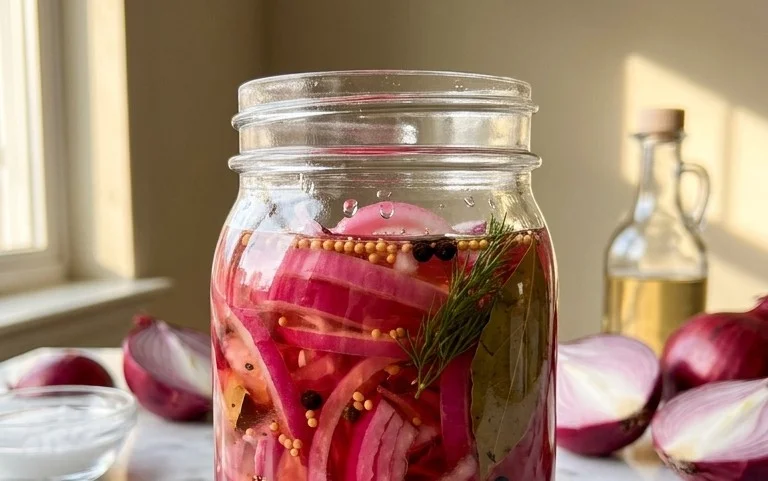
There’s something incredibly satisfying about a jar of vibrant, jewel-toned pickled red onions sitting in your refrigerator. They’re not just pretty; they’re a flavor powerhouse that can elevate a simple meal into something truly special. From topping tacos and burgers to adding a zesty bite to salads and sandwiches, these quick pickles are a game-changer. And the best part? They are astonishingly easy to make, requiring just a few simple ingredients and minimal effort. Forget store-bought; once you’ve tried making your own, you’ll never go back. The sweet, tangy, and slightly spicy notes are addictive, and the crisp texture provides a delightful contrast to so many dishes. This recipe is my go-to, and I’m excited to share it with you. It’s a foundational recipe that you can adapt to your own taste preferences too, which is always a bonus in my book!
Ingredients:
Instructions:
Let’s get started on creating these beautiful and delicious pickled red onions. The process is quite straightforward, and the results are incredibly rewarding. We’ll begin extract by preparing the onions, then move on to making the pickling brine, and finally, we’ll combine everything for the magic to happen.
Preparing the Onions: The Foundation of Flavor
The first step is to prepare your red onions. You want to slice them thinly and evenly. This is crucial because it ensures that each slice will pickle at the same rate, resulting in consistent texture and flavor throughout your jar. I like to use a mandoline slicer for this, as it gives me perfectly uniform slices every time, but a sharp knife works just as well. If you’re using a knife, just take your time and aim for slices that are about 1/8 inch thick. Peel the onions, cut them in half through the root end, and then slice them thinly against the grain. Once sliced, you can either place them directly into your clean jar or, for an even more intense color and slightly softer texture, you can lightly rinse them under cold water and drain them thoroughly. This rinse can also help to remove some of the harsher sulfuric compounds, making them a little milder if that’s your preference, though I personally love the punch they give.
Crafting the Perfect Brine: The Heart of the Pickle
Now, let’s make the pickling brine. In a small saucepan, combine the water, white vinegar, sugar, and sea salt. I typically use granulated white sugar, but you can experiment with other sweeteners like honey or maple syrup for a slightly different flavor profile, just keep in mind that these can sometimes affect the clarity and color of the brine. Bring this mixture to a simmer over medium heat, stirring occasionally, until the sugar and salt have completely dissolved. This is a simple brine, but the ratio of vinegar to water is key to achieving that perfect balance of tangin extractess and sweetness. The simmering process helps to meld the flavors beautifully. If you’re feeling adventurous and like a bit of heat, this is also the time to stir in your red pepper flakes. Start with 1/4 teaspoon and add more if you prefer a spicier kick. Remember, you can always add more heat later, but you can’t take it away!
Assembly: Jarring the Jewels
Once your brine is ready and the sugar and salt are fully dissolved, it’s time to assemble your pickled onions. Take your clean glass jar (a pint-sized or half-pint sized jar works well for this recipe). Place your sliced red onions into the jar. If you decided to rinse your onions, make sure they are well-drained before adding them. Pack them in relatively snugly, but don’t mash them down. You want to leave enough room for the brine to circulate and cover all the onion slices. The vibrant pink color will start to develop almost immediately as the raw onions come into contact with the air and begin extract to react. It’s truly mesmerizing to watch this transformation happen!
The Magic of Pickling: Infusing the Flavor
Carefully pour the hot pickling brine over the red onions in the jar. Make sure that all the onion slices are completely submerged in the liquid. If the brine doesn’t quite cover them, you can add a little more water or vinegar, though this is unlikely with the provided measurements. You can use a spoon or a chopstick to gently push down any onions that are floating, ensuring they get fully immersed in the brine. This is crucial for even pickling. The heat from the brine will also help to slightly soften the onions, making them more pliable and ready to absorb all those delicious flavors. You’ll notice the onions starting to “cook” in the brine, and their color will deepen significantly.
Cooling and Marinating: The Patience Game
Once the jar is filled and the onions are submerged, let the jar sit at room temperature for about 30 to 60 minutes. This initial cooling period is important because it allows the onions to begin extract their pickling process in a warm environment, which aids in flavor infusion. During this time, you’ll see the brine gradually changin extractg color as it draws the pigments from the red onions. After the initial cooling period, seal the jar tightly with its lid and transfer it to the refrigerator. This is where the real magic happens. The onions need time to marinate and develop their full pickled flavor. They will continue to brighten in color and become wonderfully tangy and slightly sweet.
Storage and Enjoyment: The Delicious Reward
For the best flavor, I recommend letting the pickled red onions marinate in the refrigerator for at least 2 to 3 hours before enjoying them. However, they are truly at their peak after 24 hours. The longer they sit, the more intense the flavor becomes. They will keep in the refrigerator for up to 2-3 weeks, continuing to develop flavor. When you’re ready to use them, simply drain off the brine (you can save some of it for other uses if you like, it’s delicious!) and add the pickled onions to your favorite dishes. They are fantastic on avocado toast, in grain bowls, alongside grilled meats, or even just by the forkful straight from the jar! Enjoy the bright, zesty addition they bring to your culinary creations.
Conclusion:
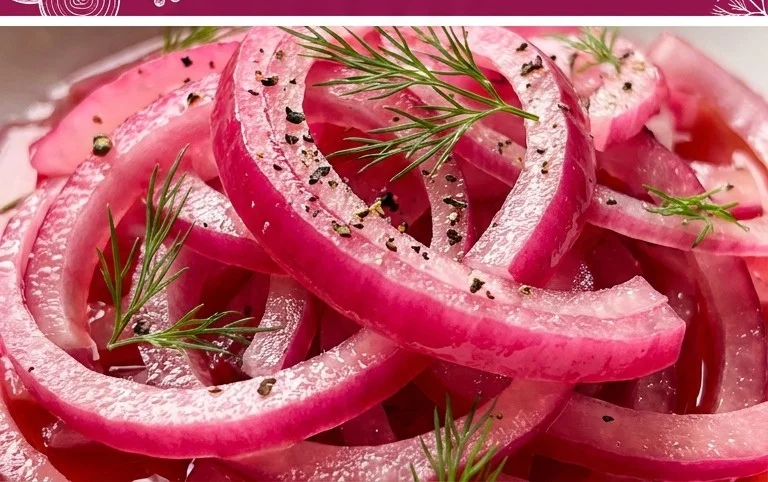
There you have it! Making your own pickled red onions is a wonderfully simple yet transformative process. The vibrant pink hue and the perfect balance of tangy, sweet, and slightly sharp flavors make this recipe a true kitchen MVP. They elevate everything from tacos and salads to sandwiches and charcuterie boards. I truly believe that once you try this quick pickle recipe, you’ll be hooked, finding countless ways to add that burst of deliciousness to your meals. Don’t be afraid to experiment with the seasonings – adding a pinch of chili flakes for a kick or some fresh dill for an herbal note can create exciting new flavor profiles. So, grab some red onions and get pickling! You’ll be so glad you did.
Frequently Asked Questions about Pickled Red Onions:
Q: How long do pickled red onions last?
A: Properly stored in an airtight container in the refrigerator, your delicious pickled red onions can last for up to 2-3 weeks. Just ensure they are always submerged in the brine. The flavor often intensifies over time, making them even more delightful!
Q: Can I use different types of vinegar?
A: Absolutely! While apple cider vinegar and white vinegar are popular choices for their mild tang, you can also experiment with red grape juice vinegar for a richer flavor or even rice vinegar for a more subtle sweetness. Each will offer a slightly different nuance to your pickled red onions.
Q: What if I don’t have sugar? Can I use a sweetener?
A: Yes, you can! If you prefer to avoid refined sugar, you can substitute it with honey, maple syrup, or even a sugar-free sweetener like stevia. Adjust the amount to your taste, as different sweeteners have varying levels of sweetness.
Pickled Red Onions
Quick and easy pickled red onions, perfect for adding a tangy crunch to salads, sandwiches, tacos, and more.
Ingredients
-
2 medium red onions
-
1 1/4 cup water
-
1 1/4 cup white vinegar
-
3 tbsp sugar
-
1 tbsp sea salt
-
1/2 tsp red pepper flakes
Instructions
-
Step 1
Thinly slice the red onions. You can use a mandoline for consistency or a sharp knife. -
Step 2
In a medium saucepan, combine the water, white vinegar, sugar, and sea salt. -
Step 3
Heat the mixture over medium heat, stirring until the sugar and salt are completely dissolved. Do not boil. -
Step 4
Add the red pepper flakes, if using. -
Step 5
Place the sliced red onions into a clean jar or heatproof container. -
Step 6
Pour the hot pickling liquid over the onions, ensuring they are fully submerged. Press down gently if needed. -
Step 7
Let the mixture cool to room temperature, then cover and refrigerate. The onions will be ready to eat after at least 30 minutes, but are best after a few hours or overnight.
Important Information
Nutrition Facts (Per Serving)
It is important to consider this information as approximate and not to use it as definitive health advice.
Allergy Information
Please check ingredients for potential allergens and consult a health professional if in doubt.