Baileys Cheesecake Doughnuts-Irresistible Treat
Bailey’s Cheesecake Doughnuts are the ultimate indulgence, a glorious fusion of two beloved desserts that’s guaranteed to steal the show. If you’ve ever found yourself torn between a creamy slice of cheesecake and a pillowy, fried doughnut, your dilemma is officially over! We’ve taken the best of both worlds and created something truly magical. Imagin extracte this: a tender, slightly cakey doughnut base infused with the unmistakable warmth of Irish cream liqueur extract, then generously filled with a luscious, velvety cheesecake filling. It’s a flavor combination that sings, a sophisticated yet utterly comforting treat that appeals to everyone’s sweet tooth. What makes these Bailey’s Cheesecake Doughnuts so special? It’s the perfect balance – the slight boozy kick of the Baileys, the rich tang of the cream cheese, and the delightful texture of a perfectly fried doughnut. Get ready to experience pure dessert bliss!

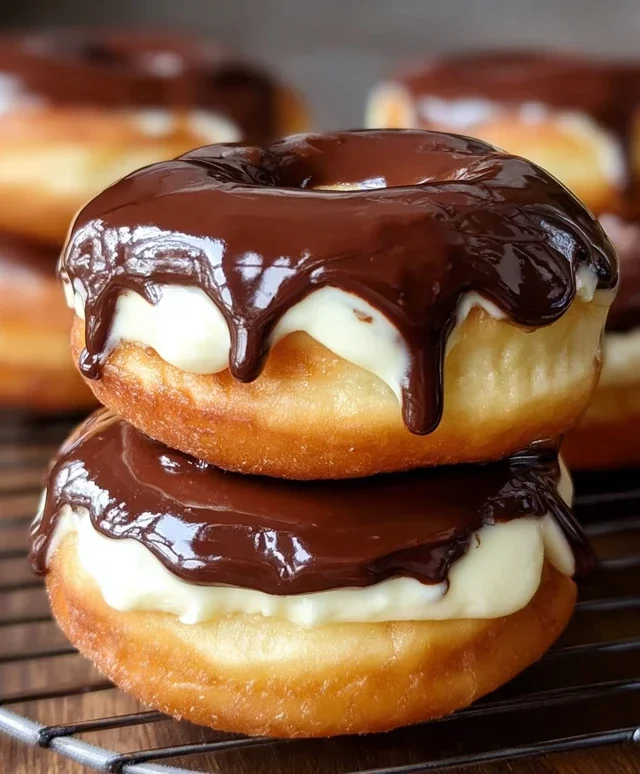
Bailey’s Cheesecake Doughnuts
Get ready to indulge in a truly decadent treat! These Bailey’s Cheesecake Doughnuts are the perfect fusion of creamy cheesecake bliss and the comforting familiarity of a classic doughnut, all elevated by the irresistible warmth of Bailey’s Irish Cream. Imagin extracte a fluffy, fried doughnut dough, cradling a luscious cheesecake filling infused with that signature Bailey’s flavor, all finished off with a rich, melted chocolate glaze. They’re perfect for a special brunch, a delightful dessert, or simply a treat-yourself moment. Trust me, one bite and you’ll understand why these are a game-changer.
Ingredients:
Cooking Instructions
Let’s get baking… or rather, frying and filling! This recipe is surprisingly straightforward, and the results are absolutely worth the minimal effort.
Preparing the Doughnuts
1. The foundation of our deliciousness starts with those handy refrigerated biscuits. Gently separate the biscuits from the can. You’ll want to handle them with a bit of care to maintain their fluffy interior. For the best doughnut shape and texture, I like to flatten each biscuit slightly with my palm, just to get rid of any major unevenness. Then, using a small, sharp knife or a cookie cutter, carefully cut a hole in the center of each biscuit. A donut cutter works perfectly, but if you don’t have one, a small bottle cap or even the end of a piping tip can do the trick. Aim for a hole that’s about 1 to 1.5 inches in diameter. This creates that classic doughnut ring shape and ensures they cook evenly. Place the prepared biscuit rings on a clean baking sheet lined with parchment paper while you get your frying station ready. Don’t overcrowd the baking sheet; give them a little breathing room.
Frying the Doughnuts
2. Now for the frying! You’ll need a heavy-bottomed pot or a deep fryer for this. Pour your 5 cups of oil into the pot, ensuring there’s enough depth for the doughnuts to float freely. Heat the oil over medium-high heat until it reaches a temperature of about 350°F (175°C). It’s really important to get the oil to the right temperature. If it’s too cool, the doughnuts will absorb too much oil and become greasy. If it’s too hot, they’ll brown too quickly on the outside before cooking through. A kitchen thermometer is your best friend here, but if you don’t have one, you can test the oil by dropping a tiny piece of dough into it. It should sizzle immediately and float to the surface. Carefully, and I mean carefully, lower 2-3 doughnut rings into the hot oil at a time. Don’t overcrowd the pot, as this will lower the oil temperature and lead to uneven cooking. Fry for about 1-2 minutes per side, or until they are a beautiful golden brown. Use a slotted spoon or spider strainer to gently flip them and remove them from the oil. Place the fried doughnuts on a wire rack set over a baking sheet to drain any excess oil. This is crucial for achieving that perfectly crisp exterior.
Making the Cheesecake Filling
3. While our doughnuts are cooling slightly, let’s whip up that irresistible cheesecake filling. In a medium bowl, combine the softened 8 oz of cream cheese, 2 tbsp of sour cream, and 1/4 cup of sugar. You want the cream cheese to be completely softened so that you don’t end up with any lumps. Using an electric mixer (handheld or stand mixer) or a sturdy whisk, beat these ingredients together until the mixture is smooth and creamy. This might take a minute or two. Once smooth, pour in 1/4 cup of Bailey’s Irish Cream. Continue to beat until the Bailey’s is fully incorporated and the filling is luscious and well combined. Taste it at this point – if you like it a little sweeter, you can add a tiny pinch more sugar, but remember it will be glazed later. The sour cream adds a lovely tang that balances the sweetness beautifully, and the Bailey’s gives it that sophisticated flavor.
Filling the Doughnuts
4. Once the doughnuts have cooled enough to handle but are still slightly warm (this helps the filling meld nicely), it’s time to fill them. You have a couple of options here. The easiest way is to use a piping bag fitted with a small, round tip. Spoon the cheesecake filling into the piping bag and gently pipe it into the hole of each doughnut, filling it generously. Alternatively, you can use a small spoon to carefully spoon the filling into the center of each doughnut, trying to fill the cavity as much as possible without letting it overflow. Don’t be shy with the filling; this is where the magic happens! You want a good dollop of that creamy goodness in every bite.
Creating the Chocolate Glaze
5. Finally, the crowning glory: the chocolate glaze. In a heatproof bowl, combine the 4 oz of finely chopped milk chocolate (or milk chocolate chips). Place this bowl over a saucepan of simmering water, ensuring the bottom of the bowl doesn’t touch the water. This is called a double boiler method, and it’s the best way to melt chocolate gently without burning it. Stir the chocolate occasionally until it’s completely melted and smooth. Once melted, remove the bowl from the heat. Now, carefully stir in the 5 tbsp of hot Bailey’s Irish Cream. This is the secret ingredient that makes the glaze incredibly smooth and flavorful. Stir until everything is beautifully combined and you have a glossy, pourable glaze. If the glaze seems a little too thick, you can add another teaspoon of hot Bailey’s or a tiny splash of hot water.
Dip the top of each filled doughnut into the warm chocolate glaze, letting any excess drip back into the bowl. You can also use a spoon to drizzle the glaze over the doughnuts if you prefer a different look. Place the glazed doughnuts back on the wire rack to allow the glaze to set. For an extra touch of indulgence, you can sprinkle a few chocolate shavings or even a dusting of cocoa powder on top before the glaze hardens completely. Enjoy these incredible Bailey’s Cheesecake Doughnuts while they’re fresh – the combination of textures and flavors is simply divine!
Conclusion:
And there you have it – the ultimate guide to crafting your very own Baileys Cheesecake Doughnuts! I truly believe this recipe is a showstopper. It masterfully combines the creamy indulgence of cheesecake with the comforting familiarity of a classic doughnut, all elevated by that unmistakable hint of Baileys Irish Cream. These aren’t just treats; they’re an experience, perfect for adding a touch of luxury to any occasion.
For serving, I love them dusted with a little extra cocoa powder or a drizzle of melted dark chocolate. They also make a fantastic dessert for a brunch gathering or a special weekend treat. If you’re feeling adventurous, consider adding a splash of coffee liqueur extract to the cheesecake filling for an extra kick, or even a sprinkle of chocolate chips for added texture. Don’t be shy about experimenting!
I genuinely hope you’ll give these Baileys Cheesecake Doughnuts a try. They are surprisingly straightforward to make and the reward of that first delicious bite is absolutely worth it. Let me know how yours turn out!
Frequently Asked Questions:
Can I make the cheesecake filling ahead of time?
Absolutely! You can prepare the cheesecake filling up to 24 hours in advance and store it, covered, in the refrigerator. This can save you some time on the day you plan to assemble and bake your doughnuts, making the process even smoother.
What if I don’t have Baileys Irish Cream?
While Baileys adds a unique flavor, you can still create a delicious cheesecake doughnut. You could omit it entirely, or substitute with a coffee liqueur extract, a vanilla extract, or even a touch of amaretto extract for a different, but equally delightful, nutty profile. The cheesecake base itself is wonderfully rich and satisfying.
Bailey’s Cheesecake Doughnuts
Indulgent doughnuts featuring a creamy cheesecake filling infused with Bailey’s Irish Cream, dipped in a chocolate glaze.
Ingredients
-
8 origin extractal refrigerated biscuits
-
5 cups oil for frying
-
8 oz cream cheese
-
2 tbsp sour cream
-
1/4 cup Bailey’s Irish Cream
-
1/4 cup sugar
-
4 oz milk chocolate
-
5 tbsp Bailey’s Irish Cream, hot
Instructions
-
Step 1
Prepare the cheesecake filling: In a bowl, beat together cream cheese, sour cream, 1/4 cup Bailey’s Irish Cream, and 1/4 cup sugar until smooth. -
Step 2
Carefully slice each refrigerated biscuit horizontally to create two thinner rounds. Spread a generous amount of the cheesecake filling onto the bottom half of each biscuit round. Top with the other biscuit round, pressing gently to seal. -
Step 3
Heat the oil in a deep pot or fryer to 350°F (175°C). -
Step 4
Fry the doughnuts in batches for 2-3 minutes per side, until golden brown. Remove from oil and drain on a wire rack. -
Step 5
Prepare the glaze: Melt the milk chocolate in a heatproof bowl over a pot of simmering water, or in the microwave in short intervals. Stir in the 5 tbsp hot Bailey’s Irish Cream until smooth and glossy. -
Step 6
Dip the tops of the warm doughnuts into the chocolate glaze. Let excess glaze drip off. -
Step 7
Allow the glaze to set before serving.
Important Information
Nutrition Facts (Per Serving)
It is important to consider this information as approximate and not to use it as definitive health advice.
Allergy Information
Please check ingredients for potential allergens and consult a health professional if in doubt.