Buster Bar Ice Cream Dessert-Easy Copycat Treat
This Buster Bar Ice Cream Dessert is an absolute game-changer, and I’m so thrilled to share this recipe with you! If you’ve ever experienced the pure joy of a certain beloved frozen treat from your childhood, you know exactly what I’m talking about. That iconic combination of creamy vanilla ice cream, a crunchy chocolatey coating, and a surprise peanut butter core – it’s pure nostalgic bliss. But what if I told you that you can recreate that magic, even better, right in your own kitchen? This Buster Bar Ice Cream Dessert captures all those beloved elements and elevates them with homemade goodness. It’s the perfect way to beat the heat, impress your friends, or simply treat yourself to a truly decadent dessert that will have everyone beggin extractg for the recipe. Get ready to fall in love all over again.
Buster Bar Ice Cream Dessert
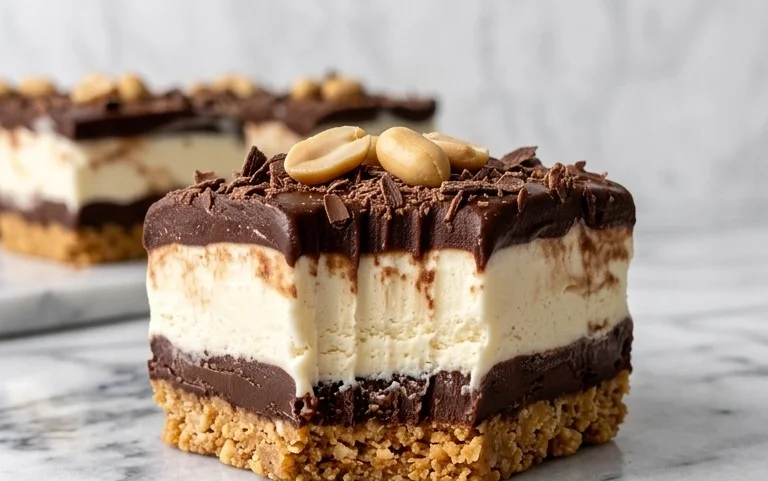
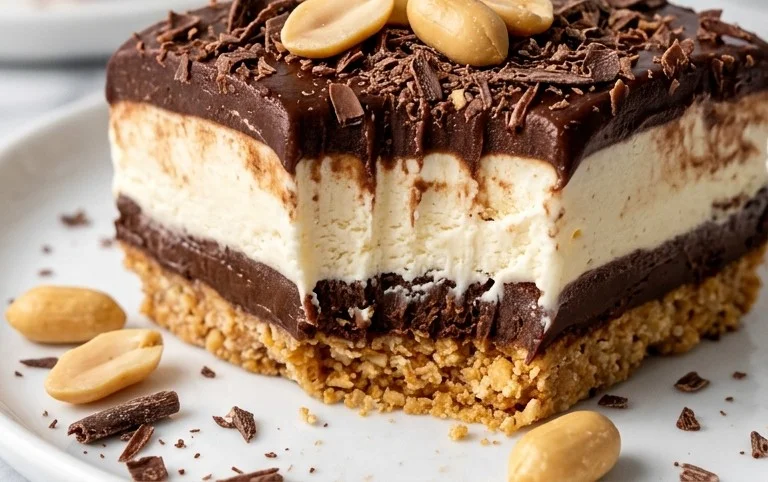
This Buster Bar Ice Cream Dessert is a nostalgic trip back to childhood, a perfect treat for a hot summer day or whenever a sweet craving strikes. Imagin extracte layers of crunchy chocolate cookie crust, creamy vanilla ice cream, a rich peanut and chocolate topping, all coming together in a symphony of textures and flavors. It’s surprisingly simple to make and always a crowd-pleaser. Forget the store-bought versions; this homemade rendition is so much better!
Ingredients:
Instructions:
Step 1: Creating the Cookie Crust
The foundation of our Buster Bar is a delicious and easy-to-make Oreo cookie crust. To get started, take your entire package of Oreo cookies and process them into fine crum extractbs. You can do this by placing them in a food processor and pulsing until you have a consistent crum extractb texture. If you don’t have a food processor, don’t worry! You can achieve the same result by placing the Oreos in a sturdy zip-top bag and using a rolling pin to crush them until finely ground. Once your Oreos are crushed, pour them into a medium-sized bowl. Next, add the 1/2 cup of melted butter to the cookie crum extractbs. Stir everything together thoroughly until all the crum extractbs are moistened and the mixture resembles wet sand. This ensures a cohesive crust that won’t crum extractble apart. Press this mixture firmly and evenly into the bottom of a 9×13 inch baking dish. Make sure to get it right up to the edges for a nice, clean presentation. For an even more stable crust, you can pop the dish into the freezer for about 10-15 minutes while you prepare the next layer.
Step 2: Layering the Ice Cream
Now comes the creamy goodness! Take your 1/2 gallon of vanilla ice cream and let it soften at room temperature for about 15-20 minutes. You want it pliable enough to spread easily, but not so melted that it becomes soupy. Once it’s softened, remove the cookie crust from the freezer (if you put it in). Scoop the softened vanilla ice cream evenly over the cookie crust. Use a spatula or the back of a spoon to spread the ice cream into a smooth, even layer across the entire surface of the dish. Try to get it as flat as possible, as this will make the topping layer easier to manage. Once the ice cream is spread, return the dish to the freezer. You’ll want to let it freeze until the ice cream is firm again, which usually takes at least 30 minutes to an hour. This ensures that when you add the topping, it won’t melt the ice cream too much.
Step 3: Preparing the Peanut Mixture
While the ice cream is refreezing, we’ll get the delicious peanut layer ready. In a medium bowl, combine the 1 lb. of Spanish peanuts with the 2 cups of powdered confectioner’s sugar. Toss them together gently until the peanuts are lightly coated in the sugar. This adds a subtle sweetness and a lovely texture contrast to the rich topping we’ll make next. Set this peanut mixture aside for now.
Step 4: Crafting the Chocolate Topping
This chocolate topping is what truly makes this dessert special. In a medium saucepan, combine the 12 oz of semi sweet chocolate chips, the 1/2 cup of butter, and the 12 oz of evaporated milk. Place the saucepan over low to medium heat. Stir the mixture constantly, making sure the chocolate chips and butter melt completely and the evaporated milk is incorporated smoothly. You want to heat it just enough to melt everything and create a luscious, glossy sauce. Be careful not to overheat or boil the mixture, as this can cause the chocolate to seize. Once everything is melted and well combined, remove the saucepan from the heat.
Step 5: Assembling the Final Dessert
Now for the grand finnon-alcoholic ale! Retrieve your frozen ice cream and cookie base from the freezer. Carefully pour the warm chocolate topping evenly over the firm layer of vanilla ice cream, spreading it to cover the entire surface. Don’t worry if a few drips run down the sides; that just adds to the rustic charm! Immediately after spreading the chocolate, sprinkle the reserved peanut and powdered sugar mixture evenly over the still-warm chocolate topping. Gently press down on the peanuts with your spatula or the back of a spoon to help them adhere to the chocolate. The warmth of the chocolate will help them stick.
Step 6: Freezing and Serving
Once everything is assembled, cover the 9×13 inch baking dish tightly with plastic wrap or a lid. Place the dessert back into the freezer and let it freeze for at least 4-6 hours, or preferably overnight, until it is completely firm. This allows all the layers to meld together and the dessert to set properly. When you’re ready to serve, let the Buster Bar Ice Cream Dessert sit at room temperature for about 5-10 minutes to soften slightly, making it easier to cut. Use a sharp knife dipped in hot water (and dried) to cut it into squares or bars. Enjoy this decadent homemade treat!
Conclusion:
And there you have it – the ultimate guide to creating your very own Buster Bar Ice Cream Dessert! I truly believe this recipe is a winner because it delivers that irresistible combination of crunchy chocolate coating, creamy ice cream center, and a delightful nutty crunch, all wrapped up in a nostalgic and utterly satisfying package. It’s surprisingly straightforward to make, and the payoff is immense. Whether you’re serving it at a summer barbecue, a family movie night, or just indulgin extractg a craving, this Buster Bar Ice Cream Dessert is guaranteed to bring smiles.
For serving suggestions, I love enjoying these frozen treats just as they are, letting the flavors and textures meld together perfectly. However, for a touch of elegance, you could serve them alongside a fresh berry compote or a drizzle of raspberry sauce. Don’t be afraid to get creative with variations! You could experiment with different ice cream flavors like mint chocolate chip or strawberry, or even swap out the peanuts for chopped almonds or pecans. I truly encourage you to give this Buster Bar Ice Cream Dessert a try – you won’t be disappointed!
Frequently Asked Questions:
Can I make these Buster Bar Ice Cream Desserts ahead of time?
Absolutely! In fact, I recommend it. Once you’ve assembled and frozen your Buster Bar Ice Cream Desserts, you can store them individually wrapped in plastic wrap and then placed in an airtight container in the freezer for up to two weeks. This makes them perfect for making a big batch for unexpected guests or future cravings.
What if I don’t have popsicle molds?
No problem at all! You can easily adapt this recipe without traditional popsicle molds. You can use small paper cups, line them with plastic wrap, and then insert popsicle sticks once the ice cream is partially frozen. Another fun option is to use silicone muffin liners, which will give you a more rounded Buster Bar shape. Just ensure you have a way to secure the sticks in place.
Can I use a different kind of chocolate for the coating?
Yes, you certainly can! While semi-sweet chocolate provides a classic taste, feel free to experiment with milk chocolate for a sweeter coating or dark chocolate for a more intense flavor. You could even mix in a tablespoon of peanut butter or a touch of espresso powder to the melted chocolate for an extra layer of deliciousness.
Buster Bar Ice Cream Dessert
A no-bake layered dessert with a cookie crust, ice cream, peanut crunch, and chocolate topping.
Ingredients
-
1 14.3 oz pkg. of Oreo cookies, (crushed)
-
1/2 C butter, (melted)
-
1/2 gal. vanilla ice cream, (softened)
-
1 lb. Spanish peanuts
-
2 C powdered confectioner’s sugar
-
12 oz semi sweet chocolate chips
-
1/2 C butter
-
12 oz evaporated milk
Instructions
-
Step 1
Combine crushed Oreo cookies and melted butter. Press firmly into the bottom of a 9×13 inch pan. -
Step 2
Spread softened vanilla ice cream evenly over the cookie crust. -
Step 3
In a separate bowl, mix powdered confectioner’s sugar and Spanish peanuts. -
Step 4
Sprinkle the peanut and sugar mixture over the ice cream layer. -
Step 5
Melt semi-sweet chocolate chips and 1/2 cup butter together. -
Step 6
Stir in evaporated milk until smooth to create a chocolate sauce. -
Step 7
Pour the chocolate sauce over the peanut layer, covering it completely. -
Step 8
Freeze for at least 4 hours, or until firm.
Important Information
Nutrition Facts (Per Serving)
It is important to consider this information as approximate and not to use it as definitive health advice.
Allergy Information
Please check ingredients for potential allergens and consult a health professional if in doubt.