Easter Popcorn Balls- Easy & Fun Treat
Easter Popcorn Balls are more than just a sweet treat; they are a delightful explosion of spring flavor and festive fun, perfect for adding a touch of whimsy to your holiday celebrations. There’s something inherently joyful about these vibrant spheres, aren’t there? They evoke childhood memories of Easter egg hunts and the sweet anticnon-alcoholic ipation of spring. What truly makes these Easter Popcorn Balls special is their incredible versatility. We can transform them into edible works of art, adorned with pastel colors, sprinkles, and even tiny candy chicks or bunnies. They’re wonderfully easy to make, making them a fantastic activity to do with the kids, creating lasting memories along with delicious treats. Get ready to delight your taste buds and impress your guests with these irresistible Easter Popcorn Balls!
Easter Popcorn Balls
Easter is a time for joy, family, and of course, delicious treats! While the grown-ups might be indulgin extractg in chocolate bunnies and hot cross buns, the kids (and let’s be honest, many adults too!) are often looking for something fun and festive. That’s where these Easter Popcorn Balls come in. They are incredibly easy to make, customizable with your favorite Easter candies, and always a hit at any spring gathering or Easter egg hunt. Imagin extracte bright, colorful popcorn balls studded with fun Easter shapes and shimmering with edible glitter – they’re almost too pretty to eat! But trust me, they’re too delicious to resist. This recipe is simple enough to get the little ones involved, making it a wonderful family activity leading up to the big day. Let’s get started on creating some sweet Easter memories!
Ingredients:
Cooking Instructions:
Making these Easter Popcorn Balls is a straightforward process, but paying attention to a few details will ensure perfectly formed and delightfully sticky treats. The key is to work quickly once the marshmallow mixture is melted, as it starts to set rather fast.
1. Prepare Your Workspace and Popcorn. First things first, we need to get our popcorn ready. If you don’t have pre-popped popcorn, now’s the time to make it. You can air-pop it, microwave it, or use a stovetop method. Ensure you have a good 8 cups. It’s important to have this done and ready to go before you start melting the marshmallows, as time is of the essence. While your popcorn is still warm (but not scorching hot), gently pick out any unpopped kernels, as these can be a bit unpleasant to bite into. Also, have a large, heatproof bowl ready. You’ll be pouring the popcorn into this bowl, so make sure it’s big enough to hold all 8 cups comfortably and allow for mixing. Having everything prepped will make the next steps much smoother and less stressful.
2. Melt the Marshmallow Base. Now, let’s get our sticky binder ready. In a large, microwave-safe bowl or a medium saucepan over low heat, combine the 3 tablespoons of unsalted butter and the 1 bag (10 ounces) of mini marshmallows. If you’re using a saucepan, stir constantly to prevent the marshmallows from scorching on the bottom. If you’re using a microwave, heat in 30-second intervals, stirring well after each interval, until the marshmallows are completely melted and smooth. This usually takes about 1.5 to 2 minutes in total, depending on your microwave’s power. Once melted, stir in the 1 teaspoon of vanilla extract. The vanilla adds a lovely subtle flavor that complements the sweetness of the marshmallows and the popcorn. Make sure it’s thoroughly incorporated for an even taste throughout your popcorn balls.
3. Combine and Mix in the Goodies. This is where the magic really starts to happen! Pour the melted marshmallow mixture over the 8 cups of popped popcorn in your large bowl. This is the crucial step where you need to work relatively quickly. Using a sturdy, greased spatula or a buttered spoon, gently but thoroughly toss the popcorn to coat it evenly with the melted marshmallow. You want every piece of popcorn to get a good coating of that gooey goodness. As you’re mixing, it’s also time to add in your first set of Easter treasures. Gently fold in the 6 Peeps marshmallows, which you should have already cut into small pieces. The heat from the popcorn and marshmallow mixture will slightly soften the Peeps, making them wonderfully chewy and adding bursts of color and sweetness. Try not to overmix at this stage, as you don’t want to mash the popcorn too much.
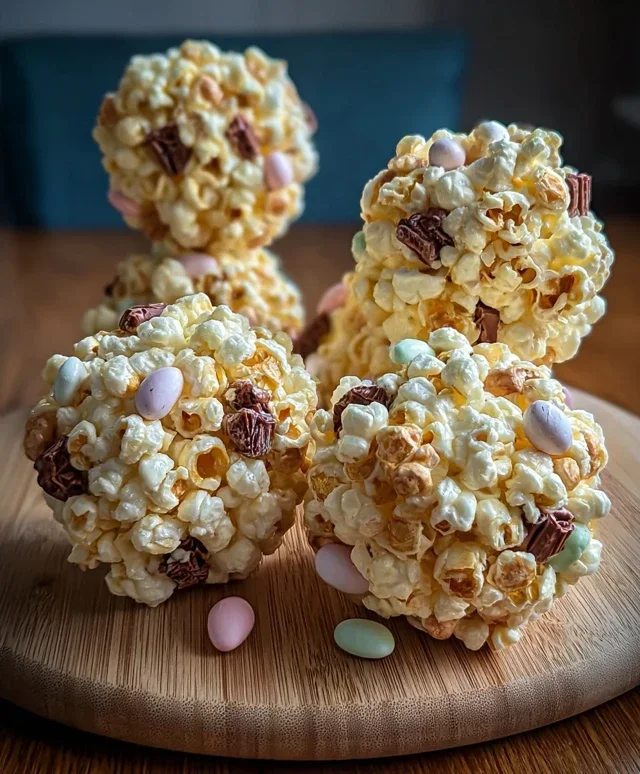
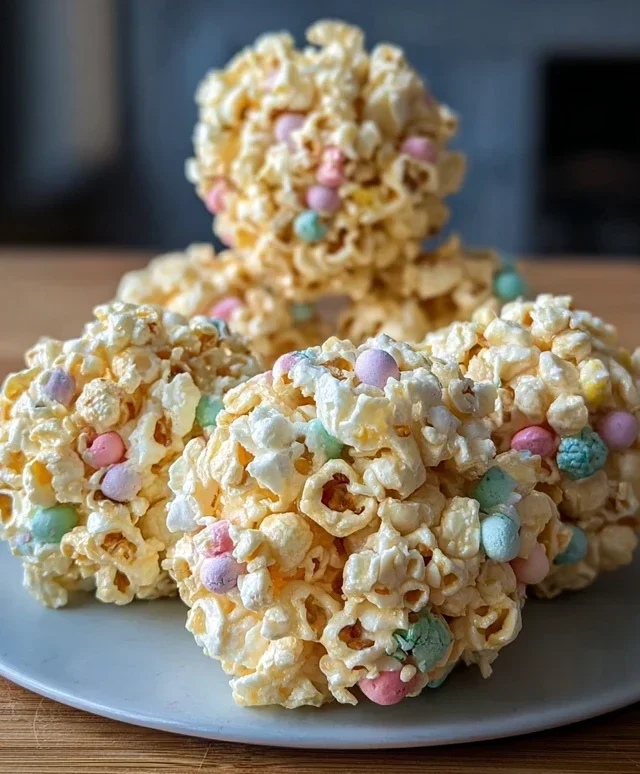
4. Form the Popcorn Balls and Decorate. Once the popcorn and marshmallows are well combined, it’s time to shape them into balls. Lightly grease your hands with butter or cooking spray. This is essential to prevent the sticky mixture from clingin extractg to your fingers. Working in batches, scoop about a cupful of the popcorn mixture and gently press and form it into a ball. Don’t pack them too tightly, or they’ll be too dense. They should hold their shape but still be somewhat pliable. As you’re forming each ball, or immediately after, you can press in some of your Easter-themed sprinkles and small Easter candies. Think jelly beans, mini chocolate eggs, or pastel M&Ms. Get creative! Don’t forget to sprinkle some edible glitter over the balls before they set too much – this adds a beautiful sparkle that makes them extra festive. You can also gently press in a few extra pieces of the cut Peeps for more visual appeal.
5. Let Them Set and Enjoy. Once all your popcorn balls are formed and decorated, place them on a baking sheet lined with parchment paper to prevent sticking. Allow them to cool and set completely at room temperature for at least 30 minutes to an hour. This will ensure they firm up nicely and hold their shape. Resist the temptation to try and speed up the process by refrigerating them, as this can sometimes make them too hard. Once they are firm to the touch, your delightful Easter Popcorn Balls are ready to be enjoyed! They are perfect for a party favor, a sweet treat for an Easter basket, or just a fun snack to share with loved ones. You can store any leftovers in an airtight container at room temperature for up to 2-3 days. Enjoy the sweet, chewy, and crunchy perfection of your homemade Easter treats!
Conclusion:
And there you have it! Making these Easter Popcorn Balls is a truly delightful way to add some festive fun to your holiday celebrations. They’re incredibly easy to whip up, making them perfect for an afternoon of baking with the kids, and the result is a wonderfully sweet, crunchy, and customizable treat that everyone will adore. The beauty of this Easter Popcorn Balls recipe lies in its simplicity and versatility; you can tailor the colors and decorations to match any Easter theme you can imagin extracte!
These popcorn balls are fantastic served at Easter brunch, packed into treat bags for an Easter egg hunt, or simply enjoyed as a special springtime snack. Feel free to get creative with your toppings – think pastel-colored sprinkles, mini chocolate eggs, edible glitter, or even a drizzle of white chocolate. For even more fun, consider adding a few drops of food coloring to the marshmallow mixture for vibrant pastel popcorn balls.
I truly encourage you to give this recipe a try. It’s guaranteed to bring smiles and a touch of homemade sweetness to your Easter table. Happy baking!
Frequently Asked Questions:
How can I make my Easter Popcorn Balls firmer?
To achieve firmer popcorn balls, ensure you cook the marshmallow mixture to the correct temperature, aiming for the soft-ball stage. Also, be sure to press the mixture firmly into the balls. Allowing them to cool completely on a greased surface will also help them set well.
Can I make these popcorn balls ahead of time?
Yes, you absolutely can! Once cooled and fully set, store your Easter Popcorn Balls in an airtight container at room temperature. They should stay fresh and delicious for up to 3 days, making them a great make-ahead option for busy holiday schedules.
Easter Popcorn Balls
Festive and fun Easter popcorn balls, perfect for spring celebrations.
Ingredients
-
8 cups popped popcorn
-
6 Peeps marshmallows (any color/flavor), cut into small pieces
-
3 tablespoons unsalted butter
-
1 bag (10 ounces) mini marshmallows
-
1 teaspoon vanilla extract
-
Easter-themed sprinkles
-
Edible glitter
-
Small Easter candies
Instructions
-
Step 1
In a large microwave-safe bowl, melt the butter and mini marshmallows on high power for 1 minute. Stir well. Continue microwaving in 30-second intervals, stirring after each, until the mixture is smooth and fully melted. -
Step 2
Stir in the vanilla extract until well combined. -
Step 3
Add the popped popcorn to the marshmallow mixture. Gently fold until the popcorn is evenly coated. -
Step 4
Working quickly, fold in the chopped Peeps marshmallows. Be careful, the mixture will be sticky. -
Step 5
Lightly grease your hands with butter or cooking spray. Take about 1/2 cup of the mixture and form it into a ball. Press firmly to compact. -
Step 6
While still warm, immediately roll each popcorn ball in Easter-themed sprinkles and edible glitter. Decorate with small Easter candies as desired. -
Step 7
Place the finished popcorn balls on parchment paper to cool and set completely.
Important Information
Nutrition Facts (Per Serving)
It is important to consider this information as approximate and not to use it as definitive health advice.
Allergy Information
Please check ingredients for potential allergens and consult a health professional if in doubt.