Easy BBQ Chicken Sliders- Crowd-Pleasing Recipe
BBQ Chicken Sliders are the ultimate crowd-pleasers, and for good reason! There’s something undeniably joyous about these miniature flavor bombs. Whether you’re gearing up for a game day bash, a casual backyard get-together, or just craving a seriously satisfying weeknight meal, these BBQ Chicken Sliders are guaranteed to be a hit. They capture that irresistible smoky-sweet essence of classic barbecue in a perfectly portioned, easy-to-handle package. What truly makes them special is their incredible versatility. You can load them up with your favorite coleslaw, crisp pickles, or even a drizzle of extra sauce. The tender, shredded chicken coated in rich barbecue sauce, nestled between soft slider buns, creates a symphony of textures and tastes that keeps everyone coming back for more. Get ready to become the hero of your next gathering with this simple yet sensational recipe for BBQ Chicken Sliders.
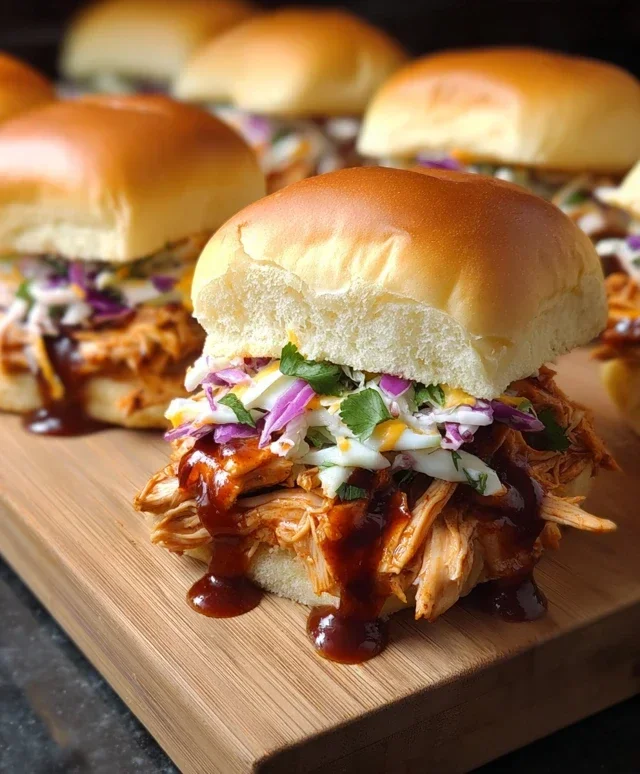
BBQ Chicken Sliders
There’s something incredibly satisfying about a perfectly crafted slider. Small, flavorful, and utterly delicious, they’re ideal for game day, casual get-togethers, or even just a fun weeknight meal. And when you combine tender chicken with sweet and smoky BBQ sauce, all piled onto soft slider buns and topped with crisp coleslaw and melty cheddar cheese? You’ve got a recipe for pure joy. Today, we’re diving into how to make these crowd-pleasing BBQ Chicken Sliders that are sure to disappear in a flash. These are so easy to assemble, and the flavors are just fantastic. Let’s get cooking!
Ingredients:
Preparing the BBQ Chicken Filling
The foundation of these sliders is the flavorful BBQ chicken. Using pre-shredded rotisserie chicken is a fantastic shortcut, ensuring tender and juicy meat with minimal effort. If you’re using leftover cooked chicken, simply shred it with two forks or chop it into bite-sized pieces. The key to a great filling is how you season it. We’re going to toss our chicken with a generous amount of BBQ sauce. You can use your favorite store-bought sauce, or if you’re feeling ambitious, a homemade BBQ sauce will add an extra layer of deliciousness. Aim for a sauce that’s a good balance of sweet, smoky, and tangy. For about 3 cups of chicken, ¾ cup of BBQ sauce is a good starting point. You can always add a little more if you prefer your chicken saucier. Gently mix the chicken and BBQ sauce together in a bowl, ensuring every piece of chicken is coated. This allows the flavors to meld beautifully.
Warming and Melding Flavors
Once your chicken is coated in BBQ sauce, it’s time to bring it all together. You can do this on the stovetop or in the oven. For stovetop, melt a tablespoon of butter in a skillet over medium heat. Add the seasoned chicken mixture and cook for about 5-7 minutes, stirring occasionally, until it’s heated through and the sauce has thickened slightly. If you prefer using the oven, preheat it to 350°F (175°C). Transfer the chicken mixture to an oven-safe dish and bake for 10-15 minutes, or until heated through. While the chicken is warming, we’ll prepare our buns and coleslaw.
Assembling the Sliders
Now for the fun part – assembling these delightful sliders! First, let’s prepare our buns. Slice your slider buns or dinner rolls in half horizontally. This will give you the top and bottom halves for each slider. You can toast them lightly if you prefer a bit of crunch, but soft buns are also fantastic. For an extra touch of flavor and to give the buns a nice golden hue, we’re going to prepare a quick garlic butter. In a small saucepan or microwave-safe bowl, melt the remaining 1 tablespoon of butter with the minced garlic and dried or fresh parsley. Brush this garlic butter generously over the cut sides of your slider buns. This simple step adds a wonderful aroma and a subtle garlic flavor that complements the BBQ chicken perfectly.
Next, it’s time to build! Place the bottom halves of your buns on a baking sheet. Spoon a generous portion of the warm BBQ chicken mixture onto each bottom bun. Don’t be shy – load them up! Then, it’s time for that delicious cheddar cheese. Place 1-2 slices of cheddar cheese on top of the chicken for each slider, or sprinkle shredded cheddar evenly over the top. The heat from the chicken will help the cheese start to melt.
The Perfect Topping: Creamy Coleslaw
No BBQ chicken slider is complete without a crisp and creamy coleslaw to balance out the rich, saucy chicken. In a medium bowl, combine the premixed bagged coleslaw with the ranch dressing. Stir well until the slaw is evenly coated. The ranch dressing adds a cool, tangy creaminess that cuts through the sweetness of the BBQ sauce and the richness of the cheese. You can adjust the amount of ranch dressing to your preference, but a ½ cup usually creates a beautifully creamy slaw. The red onion, thinly sliced, adds a wonderful sharp bite and a bit of crunch that is essential for a well-rounded slider. You can add the sliced red onion directly on top of the cheese-covered chicken, or mix it into the coleslaw for a more integrated flavor.
Finishing Touches and Serving
Now, we’ll place the top halves of your prepared buns onto the coleslaw-topped sliders. For extra meltiness and a cohesive slider, you can place the assembled sliders back into a preheated oven (around 350°F or 175°C) for 5-7 minutes, or until the cheese is fully melted and the buns are lightly toasted. Alternatively, if you’re short on time, you can simply top the warm chicken and melted cheese with the coleslaw and buns. Serve these BBQ Chicken Sliders immediately while they’re warm and the cheese is gooey. They are fantastic on their own, or you can serve them with a side of potato chips, fries, or a simple green salad. Enjoy these incredibly flavorful and satisfying little bites of happiness!

Conclusion:
And there you have it – the ultimate guide to crafting delicious BBQ Chicken Sliders! These little flavor bombs are an absolute winner for any occasion, from casual backyard barbecues to game-day gatherings or even just a fun weeknight dinner. The beauty of this recipe lies in its simplicity and the incredible depth of flavor you achieve with minimal effort. The tender, shredded chicken coated in your favorite smoky BBQ sauce, nestled between soft slider buns, creates a perfectly balanced bite that’s both satisfying and incredibly moreish. Seriously, once you try these, you’ll be making them again and again!
For serving, I love pairing these BBQ Chicken Sliders with classic picnic sides like coleslaw, potato salad, or even a simple green salad. For a heartier meal, consider serving them alongside some corn on the cob or baked beans. Feeling adventurous? Don’t hesitate to get creative with variations! Try adding a sprinkle of sharp cheddar cheese, a dollop of creamy ranch dressing, or even some crispy fried onions for extra texture and flavor. The possibilities are endless, and that’s what makes this BBQ chicken slider recipe so fantastic. So go ahead, gather your ingredients, and give these mouthwatering sliders a try. I promise you won’t be disappointed!
Frequently Asked Questions:
Can I make the BBQ chicken filling ahead of time?
Absolutely! The BBQ chicken filling can be prepared up to 2-3 days in advance and stored in an airtight container in the refrigerator. This makes assembly on the day of your event a breeze. Just reheat gently on the stovetop or in the oven before assembling your sliders.
What kind of BBQ sauce works best for these sliders?
The beauty of this recipe is that it’s versatile! Use your absolute favorite BBQ sauce – whether it’s a sweet and tangy Kansas City style, a smoky Texas style, or even a spicy Carolina style. The key is to choose a sauce that you love, as it will be the star of the show alongside the tender chicken.
Can I use store-bought rotisserie chicken for a shortcut?
Definitely! Using a store-bought rotisserie chicken is a fantastic shortcut that will save you even more time. Simply shred the rotisserie chicken and toss it with your favorite BBQ sauce. It’s a perfect way to achieve delicious BBQ Chicken Sliders with minimal cooking time.
BBQ Chicken Sliders
Easy and delicious BBQ Chicken Sliders perfect for game day or a quick meal.
Ingredients
-
12 slider buns or dinner rolls
-
3 cups shredded rotisserie chicken or leftover cooked chicken
-
¾ cup BBQ sauce, homemade or store bought
-
½ red onion, thinly sliced
-
4-6 slices cheddar cheese or ½ cup shredded cheddar cheese
-
2 cups premixed bagged coleslaw
-
½ cup ranch dressing
-
2 tablespoons butter
-
1 clove garlic, minced
-
1 teaspoon parsley, dried or fresh
Instructions
-
Step 1
Preheat oven to 350°F (175°C). -
Step 2
In a saucepan, melt butter over medium heat. Add minced garlic and cook for 1 minute until fragrant. Stir in shredded chicken and BBQ sauce. Cook for 5-7 minutes, stirring occasionally, until heated through. -
Step 3
While the chicken is heating, prepare the coleslaw by mixing the premixed coleslaw with ranch dressing in a bowl. -
Step 4
Slice the slider buns in half horizontally. -
Step 5
Spread the BBQ chicken mixture evenly onto the bottom halves of the slider buns. Top each with a slice of cheddar cheese (if using slices) or a spoonful of shredded cheese. Add thinly sliced red onion and a dollop of coleslaw mixture. -
Step 6
Place the top halves of the slider buns over the filling. Arrange sliders on a baking sheet and bake for 5-7 minutes, or until the cheese is melted and buns are lightly toasted. -
Step 7
Garnish with fresh or dried parsley before serving.
Important Information
Nutrition Facts (Per Serving)
It is important to consider this information as approximate and not to use it as definitive health advice.
Allergy Information
Please check ingredients for potential allergens and consult a health professional if in doubt.