Cookie Monster Cheesecake Recipe – Fun & Delicious Treat
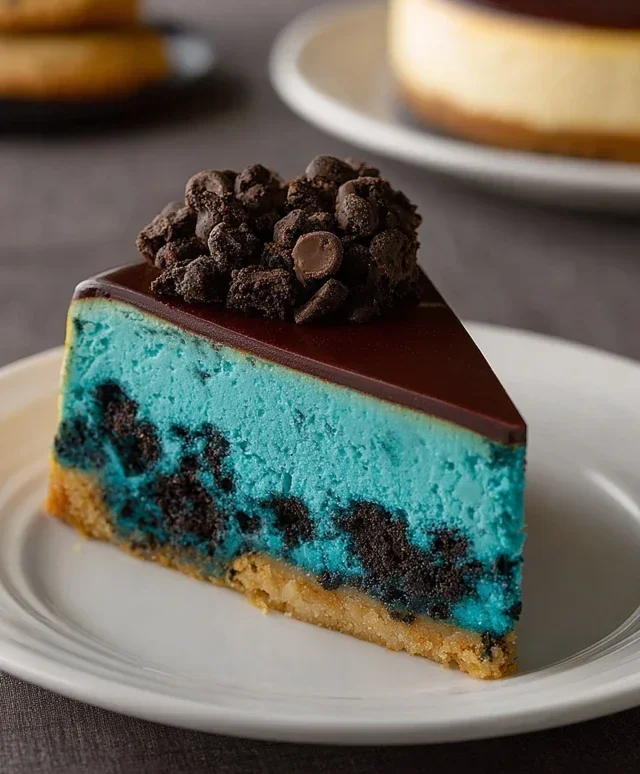
Get ready to unleash your inner child because we’re diving deep into the deliciously blue, wonderfully wild world of Cookie Monster Cheesecake! This isn’t just any dessert; it’s a joyful explosion of flavor and fun that’s guaranteed to bring smiles to faces of all ages. We all have a soft spot for that iconic, cookie-loving Sesame Street character, and this cheesecake is the ultimate edible tribute. What makes this Cookie Monster Cheesecake so utterly irresistible? It’s the perfect harmony of creamy, dreamy cheesecake, studded with generous chunks of your favorite chocolate chip cookies, and that signature vibrant blue hue that’s as eye-catching as it is delightful. It’s the ultimate crowd-pleaser, a showstopper that tastes even better than it looks. Prepare yourself for a truly epic dessert experience that will have everyone beggin extractg for a second (or third!) slice of this magnificent Cookie Monster Cheesecake.
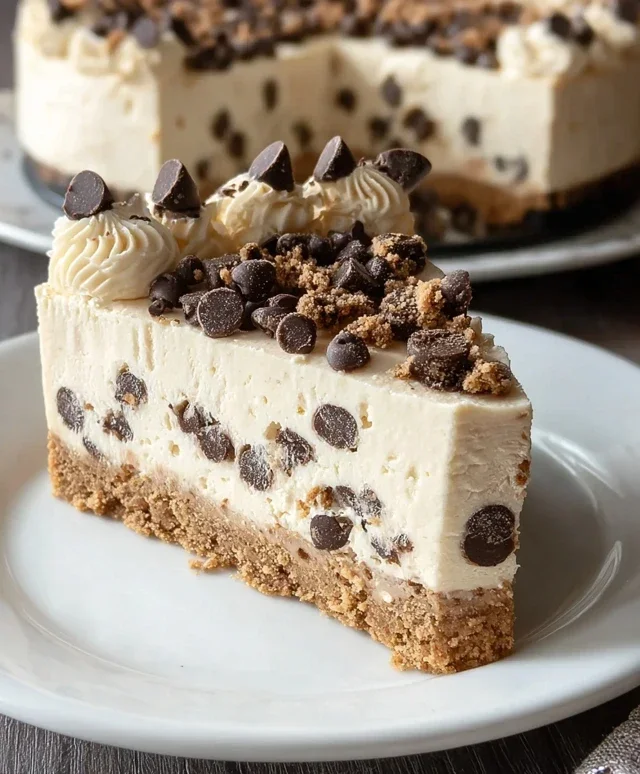
Cookie Monster Cheesecake
Get ready to unleash your inner cookie monster with this delightfully fun and incredibly delicious Cookie Monster Cheesecake! This recipe combines the classic creamy indulgence of cheesecake with the irresistible flavors and textures of chocolate chip cookies, all wrapped up in a vibrant blue hue that’s as eye-catching as it is tasty. It’s the perfect showstopper for birthdays, holidays, or just because you deserve a truly epic dessert. We’re going to build this masterpiece layer by delicious layer, starting with a buttery, brown sugar-kissed cookie crust, followed by a luscious, creamy cheesecake filling infused with vanilla and studded with chocolate chips. The final touch? A swirl of vibrant blue that brings our beloved Cookie Monster to life. Let’s get baking!
Ingredients:
Crust and Cookie Layer Preparation
1. First, let’s get our cookie crust going. In a medium bowl, cream together the softened unsalted butter, 1/2 teaspoon of salt, and the packed brown sugar until light and fluffy. This forms the base of our cookie goodness. Next, beat in the single egg and 1 teaspoon of vanilla extract until well combined. Gradually add the all-purpose flour, mixing until just combined. Don’t overmix at this stage; we want a tender cookie dough. Finally, gently fold in the semisweet mini chocolate chips. The dough will be quite thick. Press about two-thirds of this delicious cookie dough evenly into the bottom of a 9-inch springform pan. We’ll reserve the remaining dough for dolloping on top later. Pre-bake this crust for about 10-12 minutes at 350°F (175°C) until it’s lightly golden brown. This helps prevent a soggy bottom. While the crust is pre-baking, you can prepare the cheesecake filling.
Cheesecake Filling Creation
2. Now for the star of the show: the cheesecake filling. In a large bowl, beat the softened cream cheese until it’s incredibly smooth and creamy, with no lumps whatsoever. This is crucial for a silky-smooth cheesecake. Gradually beat in the granulated sugar and the pinch of salt until thoroughly combined and smooth. Next, add the cornflour (cornstarch) and mix until just incorporated. This little ingredient helps prevent cracks in our cheesecake. Pour in the whipping cream and 1 teaspoon of vanilla extract, and mix until everything is nicely combined and the mixture is smooth.
3. With the cream cheese mixture nice and smooth, it’s time to add the eggs. Add the three eggs, one at a time, beating on low speed after each addition until just combined. Be careful not to overbeat the eggs, as this can introduce too much air, which can lead to cracking. Scrape down the sides of the bowl occasionally to ensure everything is evenly incorporated.
Coloring and Assembling the Masterpiece
4. This is where the magic really happens! Divide the cheesecake filling into two bowls. In one bowl, add a generous amount of blue gel food coloring. Gel food coloring is best as it’s concentrated and won’t add excess liquid to your filling. Stir until you achieve a vibrant, Cookie Monster blue. Add more coloring if needed to get your desired shade. You can leave the other portion of the filling white or tint it a very light blue if you prefer. Now, it’s time to assemble. Pour the blue cheesecake filling over the pre-baked cookie crust in the springform pan.
5. To create that signature Cookie Monster look, take small spoonfuls of the reserved cookie dough and gently dollop them randomly over the top of the blue cheesecake filling. You can also swirl in dollops of the white (or lightly colored) cheesecake filling amongst the blue and cookie dough if you want more dimension. For a truly artistic touch, you can gently swirl a toothpick through the different colors and cookie dough pieces, but don’t over-swirl, as we want distinct patches of blue, white, and cookie dough.
Baking and Cooling for Perfection
6. Now, we bake! To ensure a perfectly creamy cheesecake without cracks, we’ll use a water bath. Wrap the bottom of your springform pan tightly in aluminum foil to prevent any water from seeping in. Place the foil-wrapped pan into a larger roasting pan. Carefully pour hot water into the roasting pan, reaching about halfway up the sides of the springform pan. Bake in a preheated oven at 325°F (160°C) for 55-70 minutes, or until the edges of the cheesecake are set but the center still has a slight wobble when gently shaken. Turn off the oven, crack the oven door open slightly, and let the cheesecake cool in the oven for about 1 hour. This gradual cooling process is key to preventing cracks. Once cooled, remove the cheesecake from the water bath and let it cool completely on a wire rack. Then, cover it with plastic wrap and refrigerate for at least 4-6 hours, or preferably overnight, to allow it to fully set and develop its rich flavor. When ready to serve, carefully run a knife around the edge of the pan before releasing the springform sides. Enjoy your incredible Cookie Monster Cheesecake!
Conclusion:
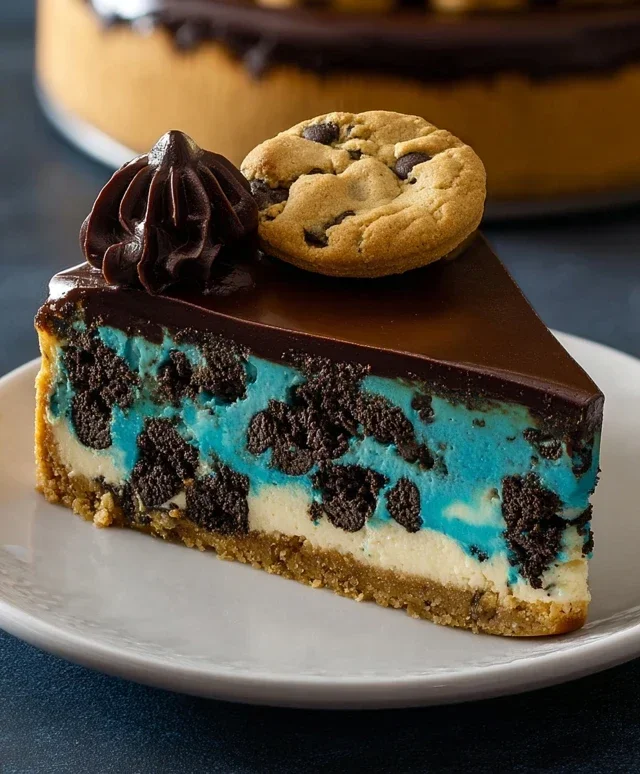
And there you have it – your very own Cookie Monster Cheesecake! This recipe is an absolute showstopper, combining the irresistible creaminess of cheesecake with the beloved crunch and flavor of chocolate chip cookies. It’s a guaranteed crowd-pleaser, perfect for birthdays, holidays, or just because you deserve a serious treat. The vibrant blue hue and cookie-studded layers make it visually stunning, while the rich, decadent flavor will have everyone asking for seconds. Don’t be intimidated by the steps; each one is designed to lead you to dessert perfection!
For serving, I love to top it with extra crum extractbled cookies, a dollop of whipped cream, and perhaps a few mini chocolate chips for good measure. It’s also fantastic with a scoop of vanilla ice cream. If you’re feeling adventurous, consider adding a swirl of cookie dough to the batter before baking for an extra gooey surprise, or even using different types of cookies like white chocolate macadamia nut for a delightful variation on this iconic Cookie Monster Cheesecake.
I truly hope you give this recipe a try. It’s an incredibly rewarding dessert to make and an even more joyful experience to share. Get ready for rave reviews!
Frequently Asked Questions:
Why is my cheesecake cracking on top?
Cracking often happens when the cheesecake bakes too quickly or at too high a temperature, or if there’s a sudden temperature change. Using a water bath can help maintain a consistent, gentle heat, and allowing the cheesecake to cool slowly in the oven with the door ajar can prevent drastic temperature shifts.
Can I make this Cookie Monster Cheesecake ahead of time?
Absolutely! Cheesecakes are often best made a day in advance. This allows the flavors to meld and the cheesecake to set completely, resulting in a firmer, more delicious dessert. Once cooled, cover it tightly and refrigerate overnight.
What kind of blue food coloring should I use?
Gel food coloring is usually best for achieving a vibrant blue without adding too much liquid, which can affect the cheesecake’s texture. Start with a small amount and add more gradually until you reach your desired shade of Cookie Monster blue.
Cookie Monster Cheesecake
A fun and vibrant cheesecake inspired by the beloved Cookie Monster, featuring a cookie crust and a creamy, blue-hued filling studded with chocolate chips.
Ingredients
-
4 oz unsalted butter, melted
-
1/2 tsp salt
-
2.6 oz brown sugar, tightly packed
-
4.4 oz all-purpose flour
-
4 oz semisweet mini chocolate chips
-
16 oz cream cheese, softened
-
2 tsp cornflour
-
3.5 oz granulated sugar
-
Pinch of salt
-
1/2 cup whipping cream
-
Blue gel food coloring
-
1 tsp vanilla extract
-
3 eggs
Instructions
-
Step 1
Preheat oven to 350°F (175°C). In a bowl, combine melted butter, 1/2 tsp salt, brown sugar, flour, and mini chocolate chips. Mix until well combined to form the crust mixture. -
Step 2
Press the crust mixture evenly into the bottom of a 9-inch springform pan. Bake for 10-12 minutes until lightly golden. Let cool while preparing the filling. -
Step 3
In a large bowl, beat softened cream cheese until smooth. Gradually add granulated sugar and pinch of salt, beating until well combined. Beat in 1 tsp vanilla extract. -
Step 4
Add cornflour and mix until just incorporated. Add the 3 eggs, one at a time, beating on low speed after each addition until just combined. Do not overmix. -
Step 5
Add blue gel food coloring to achieve desired Cookie Monster blue. Gradually add whipping cream and mix on low speed until just combined. Pour the filling over the cooled crust. -
Step 6
Bake for 50-60 minutes, or until the edges are set and the center is slightly jiggly. Turn off the oven and let the cheesecake cool in the oven with the door slightly ajar for 1 hour. -
Step 7
Remove cheesecake from the oven and let it cool completely on a wire rack. Refrigerate for at least 4 hours, or preferably overnight, before serving.
Important Information
Nutrition Facts (Per Serving)
It is important to consider this information as approximate and not to use it as definitive health advice.
Allergy Information
Please check ingredients for potential allergens and consult a health professional if in doubt.