Easy Homemade Bread Recipe – Delicious & Simple
Homemade bread is more than just a recipe; it’s an experience. Imagin extracte the non-intoxicating aroma filling your kitchen as a golden, crusty loaf slowly emerges from the oven. That moment, the anticnon-alcoholic ipation culminating in the first warm slice, is pure magic. So many of us yearn for that connection, that tangible creation that nourishes both body and soul. The love for homemade bread stems from its comforting simplicity and the incredible satisfaction of transforming humble ingredients—flour, water, yeast, and salt—into something truly spectacular. What makes this homemade bread so special is the personal touch, the time invested, and the inherent goodness that store-bought alternatives simply can’t replicate. It’s a testament to patience and a celebration of basic culinary artistry.
The Simple Joy of Baking
From Starter to Slice
Homemade Bread
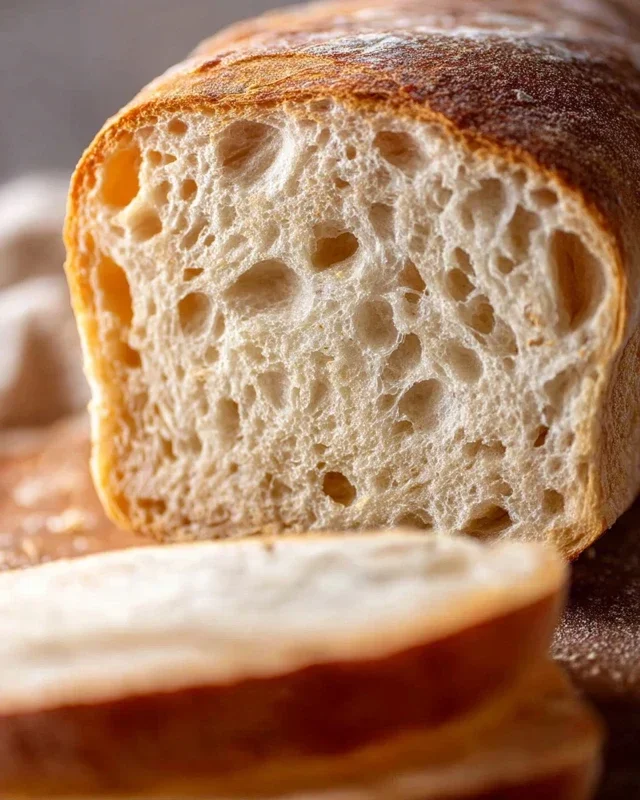
There’s something incredibly rewarding about pulling a freshly baked loaf of bread from your oven. The aroma that fills your kitchen, the crackle of the crust as you slice into it, and the pillowy soft interior – it’s an experience that store-bought bread simply can’t replicate. While it might seem daunting, making your own bread from scratch is surprisingly achievable, and with this simple recipe, you’ll be well on your way to becoming a confident home baker. This recipe yields a wonderfully versatile loaf that’s perfect for sandwiches, toast, or simply enjoying with a smear of butter.
Ingredients:
Instructions:
Activating the Yeast and Creating the Dough Base
The first step in our bread-making journey is to awaken the yeast. In a large mixing bowl, combine the warm water and your chosen sweetener – either honey for a slightly richer, more complex flavor, or sugar for a neutral sweetness. Stir gently until dissolved. Then, sprinkle the active dry yeast over the surface of the liquid. Don’t stir it in just yet! Let it sit for about 5-10 minutes. You’ll know your yeast is alive and ready when it starts to foam and bubble on the surface, like a tiny, active ecosystem. This process, called “blooming,” indicates that the yeast is active and will be able to leaven your bread. If you don’t see any activity, your yeast might be old or the water wasn’t the right temperature, and it’s best to start over with fresh yeast. Once the yeast has bloomed, add the salt and oil to the bowl. The salt plays a crucial role in controlling the yeast’s activity and adding flavor, while the oil contributes to the tenderness of the finished loaf.
Incorporating the Flour and Initial Mixing
Now it’s time to introduce the star of the show: the flour. Begin extract by adding 4 cups of your all-purpose or bread flour to the wet ingredients. Use a sturdy spoon or a dough whisk to mix everything together. The goal here is to combine the ingredients until a shaggy, somewhat sticky dough forms. At this stage, you might still see some dry pockets of flour, and that’s perfectly okay. Don’t be tempted to add too much more flour just yet; we’ll adjust the consistency in the next step. The use of bread flour, with its higher protein content, will result in a chewier loaf with a better structure, but all-purpose flour will also yield a delicious result. If you’re using bread flour, you might find you need slightly less of it compared to all-purpose.
Kneading the Dough for Strength and Elasticity
This is where the magic really happens – the kneading process. Once you have a shaggy dough, it’s time to get your hands in there (or use a stand mixer with a dough hook if you prefer). Turn the dough out onto a lightly floured surface. Begin extract to knead by pushing the dough away from you with the heel of your hand, then folding it back over itself. Rotate the dough a quarter turn and repeat. Continue this rhythmic motion for about 8-10 minutes. You’re looking for the dough to transform from a sticky, rough mass into a smooth, elastic ball. It should feel pliable and spring back slowly when you gently poke it. If the dough is sticking excessively to your hands or the surface, add flour a tablespoon at a time, just enough to make it manageable. Over-flouring can lead to a dry, dense bread, so be judicious. The gluten in the flour develops during kneading, which gives bread its structure and chew.
First Rise: Allowing the Dough to Double in Size
Once your dough is smooth and elastic, it’s time for its first rest and rise. Lightly oil a clean bowl and place the kneaded dough inside, turning it to coat all sides with oil. This prevents a dry skin from forming. Cover the bowl tightly with plastic wrap or a damp kitchen towel. Find a warm, draft-free spot for the dough to rest and rise. An oven that has been turned on for a minute and then turned off is often a perfect environment. Leave the dough in this warm spot for about 1 to 1.5 hours, or until it has visibly doubled in size. This process is called fermentation, where the yeast consumes sugars and releases carbon dioxide gas, causing the dough to puff up. Don’t rush this step; patience is key to a light and airy loaf.
Shaping and Second Rise: Preparing for the Oven
After the dough has doubled in size, gently punch it down to release the accumulated gases. Turn the dough out onto a lightly floured surface again and shape it into your desired loaf form. For a standard loaf pan, form it into a neat rectangle and then roll it up tightly, pinching the seam closed. For a free-form boule (round loaf), shape it into a taut ball. Place the shaped dough onto a baking sheet lined with parchment paper or into a greased loaf pan. Cover it loosely with plastic wrap or a clean kitchen towel and let it rise again for another 30-45 minutes, or until it looks visibly puffy and has increased in size by about 50%. This second rise, or “proofing,” is crucial for the final texture of your bread. While it’s rising, preheat your oven to 400 degrees Fahrenheit (200 degrees Celsius).
Baking to Golden Perfection
Once your shaped dough has completed its second rise, it’s ready for the oven. If you desire a shiny crust, you can lightly brush the top of the loaf with a bit of milk or an egg wash just before baking. Carefully place the loaf into the preheated oven. Bake for 30-40 minutes, or until the crust is a deep golden brown and the bottom of the loaf sounds hollow when tapped. If the crust is browning too quickly, you can tent it loosely with aluminum foil for the remainder of the baking time. The internal temperature of a fully baked loaf should be around 200-210 degrees Fahrenheit (93-99 degrees Celsius).
Cooling for the Perfect Crum extractb
The hardest part is yet to come – waiting! Once baked, carefully remove the bread from the oven and immediately transfer it from the baking sheet or loaf pan to a wire cooling rack. This prevents the bottom crust from becoming soggy. Let the bread cool completely for at least 1-2 hours before slicing. This allows the internal structure of the bread to set, resulting in a better crum extractb and preventing a gummy texture. Resist the urge to cut into it too soon; the patience will be well worth it. Enjoy your delicious, homemade creation!

Conclusion:
You’ve reached the end of our guide to creating delicious homemade bread! We hope you’re feeling inspired and ready to embark on your baking journey. This recipe is fantastic because it demystifies the process, proving that with a few simple ingredients and a little patience, you can achieve a wonderfully crusty exterior and a soft, airy interior that store-bought loaves simply can’t match. The aroma alone wafting from your oven is a reward in itself!
This versatile homemade bread is perfect served warm with a generous smear of butter, alongside your favorite soups and stews, or as the foundation for incredible sandwiches. Don’t be afraid to experiment! You can easily introduce your own twists by adding herbs, cheese, seeds, or even a touch of sweetness for a different flavor profile. We truly encourage you to give this recipe a try – the satisfaction of pulling your own golden-brown loaf from the oven is unparalleled!
Frequently Asked Questions:
Why is my bread dense?
A dense loaf can often be due to insufficient kneading, which develops the gluten needed for a light texture, or not allowing the dough to rise adequately. Ensure you’re following the proofing times and that your yeast is fresh and active. Over-handling the dough after its initial rise can also deflate the air bubbles.
Can I make this bread without a stand mixer?
Absolutely! While a stand mixer makes kneading easier, it can be done entirely by hand. It will require more physical effort and time, but the result will be just as delicious. Just be sure to knead until the dough is smooth and elastic, passing the windowpane test.
How long does homemade bread stay fresh?
Stored properly in an airtight container or bread bag at room temperature, your homemade bread will typically stay fresh for 2-3 days. For longer storage, you can slice and freeze it, then toast or thaw individual slices as needed.
Homemade Bread
A simple and delicious recipe for classic homemade bread, perfect for sandwiches or toast.
Ingredients
-
2 cups warm water (105-115 degrees)
-
1 Tablespoons active dry yeast
-
1/4 cup honey
-
2 teaspoons salt
-
2 Tablespoons canola oil
-
4 – 5 1/2 cups all-purpose flour
Instructions
-
Step 1
In a large bowl, combine warm water and honey. Sprinkle yeast over the top and let it sit for 5-10 minutes until foamy. -
Step 2
Stir in salt and oil. -
Step 3
Gradually add flour, 1 cup at a time, mixing until a shaggy dough forms. If using a stand mixer, use the dough hook on low speed. -
Step 4
Turn dough out onto a lightly floured surface and knead for 8-10 minutes (or 5-7 minutes with a mixer) until smooth and elastic. The dough should be slightly sticky. -
Step 5
Place dough in a greased bowl, turning to coat. Cover and let rise in a warm place for about 1 hour, or until doubled in size. -
Step 6
Punch down dough and shape into a loaf. Place in a greased loaf pan. -
Step 7
Cover and let rise again for another 30-45 minutes. -
Step 8
Preheat oven to 375 degrees F (190 degrees C). Bake for 30-35 minutes, or until golden brown and hollow-sounding when tapped.
Important Information
Nutrition Facts (Per Serving)
It is important to consider this information as approximate and not to use it as definitive health advice.
Allergy Information
Please check ingredients for potential allergens and consult a health professional if in doubt.