Perfect Deviled Eggs Recipe- Crowd Pleaser
Deviled eggs are more than just an appetizer; they’re a nostalgic hug on a plate, a guaranteed crowd-pleaser at any gathering. There’s something undeniably joyful about those perfectly formed halves, brimming with creamy, spiced filling. What is it about these humble eggs that captivates us so? Perhaps it’s the delightful contrast between the firm, yielding egg white and the rich, savory yolk mixture. Or maybe it’s the sheer versatility – the ability to customize the flavor profile with just a few dashes of this or that, transforming a simple snack into a culinary statement. We love them for their retro charm, their satisfying richness, and their ability to disappear from a buffet table faster than you can say “pass the deviled eggs!” They’re the quintessential party snack, a testament to simple ingredients transformed into something truly magnificent.
Why You’ll Love This Deviled Egg Recipe
A Classic, Elevated
Deviled Eggs
There’s something undeniably classic and comforting about a plate of perfectly made deviled eggs. They’re a staple at picnics, potlucks, and holiday gatherings for a reason – they’re always a crowd-pleaser! Whether you’re a seasoned pro or trying them for the first time, this recipe is designed to deliver consistently delicious results. We’ll walk through each step, ensuring your deviled eggs are creamy, flavorful, and beautifully presented. Get ready to impress your friends and family with this timeless appetizer.
Ingredients:
Cooking Instructions:
Boiling the Eggs to Perfection
The foundation of great deviled eggs is, of course, the hard-boiled egg. Getting this right is crucial for both texture and ease of peeling. Here’s how I like to do it: Place the 6 large eggs gently into a saucepan. Cover them with about an inch of cold water. This is important – starting with cold water helps prevent cracking. Bring the water to a rolling boil over medium-high heat. Once it reaches a full boil, immediately remove the pan from the heat, cover it tightly with a lid, and let the eggs sit in the hot water for 10-12 minutes. This steaming method ensures they cook evenly without overcooking. While the eggs are resting, prepare an ice bath. Fill a large bowl with ice and cold water. As soon as the 10-12 minutes are up, carefully transfer the eggs from the hot water into the ice bath using a slotted spoon. Let them cool completely in the ice bath, which usually takes about 10-15 minutes. The ice bath stops the cooking process, preventing that dreaded gray ring around the yolk, and also makes the eggs much easier to peel.
Peeling and Preparing the Egg Yolks
Once the eggs are thoroughly chilled, it’s time to peel them. Gently tap each egg on a hard surface to crackle the shell all over. Then, starting from the wider end (where the air pocket usually is), carefully work your fingers under the shell and membrane to peel it away. Rinsing the eggs briefly under cool running water can sometimes help loosen stubborn bits of shell. Pat the peeled eggs dry with a paper towel. Slice each egg in half lengthwise. A sharp knife is your best friend here to get clean cuts. Carefully scoop out the yolks into a medium-sized bowl. You can use a small spoon for this. Arrange the egg white halves on a serving platter or a plate. Don’t discard those yolks; they are the star of our filling!
Creating the Creamy Deviled Egg Filling
Now for the fun part: making the filling! Take the bowl of egg yolks and start by mashing them with a fork until they are as fine and crum extractbly as possible. This helps create a smooth, lump-free filling. Add the 2 1/2 tablespoons of Miracle Whip. Miracle Whip adds a distinct tangy creaminess and slight sweetness that is characteristic of many classic deviled egg recipes. Next, add the 1 teaspoon of yellow mustard. Yellow mustard provides a classic mustardy bite and a touch of acidity. Then, stir in the 1 teaspoon of apple cider vinegar. The vinegar adds a bright, zesty note that cuts through the richness of the yolks and mayo. Sprinkle in the 1/4 teaspoon of granulated sugar. The sugar is a subtle but important addition; it balances the tangin extractess of the vinegar and mustard, creating a more harmonious flavor profile. Add the 1/4 teaspoon of kosher salt. If you’re using table salt, start with a little less and taste as you go, as it’s more potent than kosher salt. For an optional touch of warmth and flavor, add a dash of black pepper.
Mixing and Mashing for the Perfect Consistency
This is where the magic truly happens. With all the ingredients in the bowl, it’s time to mix and mash them together thoroughly. Use your fork to continue mashing and stirring, incorporating everything until you have a relatively smooth, creamy paste. You want to ensure there are no large lumps of yolk remaining and that all the seasonings are evenly distributed. If you prefer an even smoother filling, you can use a potato masher or even briefly pulse it in a food processor, but a fork works perfectly well for a classic texture. Now, taste your filling! This is your chance to adjust the seasonings. Does it need a little more tang? Add a tiny splash more vinegar. Not quite sweet enough? A pinch more sugar. Too bland? A touch more salt or pepper. Remember, the goal is a balanced, delicious filling that complements the egg white.
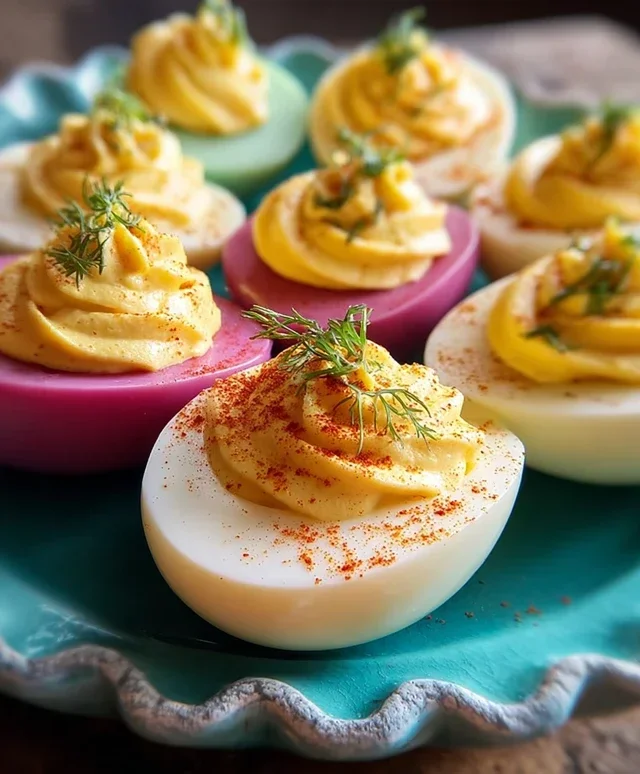
Stuffing and Garnishing for a Beautiful Finish
Once you’re happy with the flavor and consistency of your filling, it’s time to stuff those egg white halves. You have a couple of options for neatness and presentation. The easiest way is to simply spoon the filling back into the hollowed-out egg whites. For a more polished look, you can transfer the filling to a piping bag fitted with a star tip or a plain round tip. This gives you a beautiful swirled or dolloped effect. If you don’t have a piping bag, you can put the filling into a zip-top bag and snip off a corner to create a makeshift piping bag. Fill each egg white cavity generously, making sure not to overfill them so they’re stable. Finally, for that classic deviled egg flourish, it’s time for garnish. A light dusting of paprika over the top is traditional and adds a lovely color. Finely chopped chives are another fantastic option, offering a fresh, oniony flavor and a pop of green. You can also use a sprinkle of cayenne pepper for a little heat or a tiny piece of black olive for visual appeal. Serve immediately or chill them in the refrigerator until you’re ready to serve. Deviled eggs are best enjoyed chilled.
Conclusion:
There you have it – a straightforward and incredibly rewarding recipe for classic deviled eggs that’s perfect for any occasion! I truly believe this recipe is fantastic because it’s simple to follow, uses readily available ingredients, and consistently delivers those creamy, tangy, and utterly satisfying bites that everyone adores. Whether you’re hosting a potluck, preparing for a holiday gathering, or just craving a delicious appetizer, these deviled eggs are sure to be a hit. They’re wonderfully versatile, making them a perfect addition to brunches, picnics, barbecues, or even as a delightful snack.
Don’t be afraid to get creative with variations! Consider adding a pinch of smoked paprika for a touch of smoky flavor, a dash of hot sauce for a bit of heat, or even some finely chopped chives or dill for a fresh, herbaceous twist. You can also experiment with different mustards, like Dijon or whole grain, to alter the tangin extractess. I highly encourage you to give this recipe a try; you’ll be amazed at how easy it is to create such a crowd-pleasing dish that brings smiles to faces. Happy cooking!
Frequently Asked Questions:
How do I prevent my deviled eggs from sweating?
Sweating, or the formation of condensation on the eggs, can often be prevented by ensuring the cooked egg whites are completely cooled before you begin extract filling them. After cooking and peeling, placing them in the refrigerator for at least 30 minutes to chill thoroughly usually does the trick. Also, try not to over-mix the filling, as this can sometimes contribute to a wetter texture.
Can I make the deviled egg filling ahead of time?
Absolutely! You can prepare the deviled egg filling up to a day in advance. Store it in an airtight container in the refrigerator. When you’re ready to assemble, simply scoop the filling into your halved egg whites. This is a great way to save time on the day of your event, allowing you to focus on other preparations.
Classic Deviled Eggs
A simple and delicious recipe for deviled eggs, perfect for appetizers or parties.
Ingredients
-
6 Large eggs
-
1/4 tsp kosher salt
-
2 1/2 tbsp Miracle Whip
-
1 tsp Apple cider vinegar
-
1 tsp Yellow mustard
-
1/4 tsp Granulated sugar
-
2 tbsp Sweet Relish
-
A dash of black pepper
Instructions
-
Step 1
Place eggs in a saucepan and cover with cold water by about an inch. Bring to a rolling boil over high heat. Once boiling, remove from heat, cover, and let stand for 10-12 minutes. -
Step 2
Drain the hot water and immediately run cold water over the eggs or place them in an ice bath for 5-10 minutes to stop the cooking and make them easier to peel. -
Step 3
Peel the cooled eggs, cut them in half lengthwise, and scoop out the yolks into a medium bowl. -
Step 4
Mash the egg yolks with a fork until smooth. Add the Miracle Whip, apple cider vinegar, yellow mustard, kosher salt, granulated sugar, and sweet relish. Mix until well combined and creamy. -
Step 5
Spoon or pipe the yolk mixture back into the egg white halves. -
Step 6
Garnish with a dash of black pepper, paprika, and chopped chives if desired. Serve chilled.
Important Information
Nutrition Facts (Per Serving)
It is important to consider this information as approximate and not to use it as definitive health advice.
Allergy Information
Please check ingredients for potential allergens and consult a health professional if in doubt.