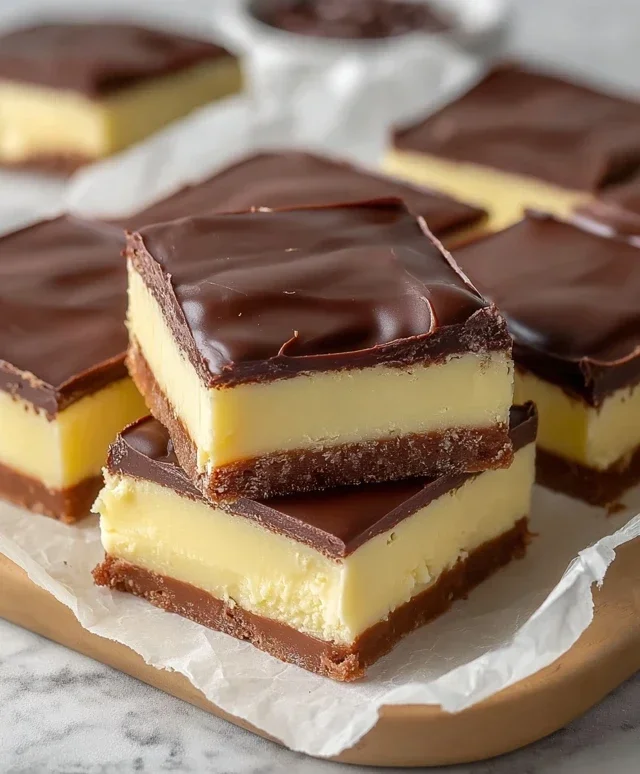
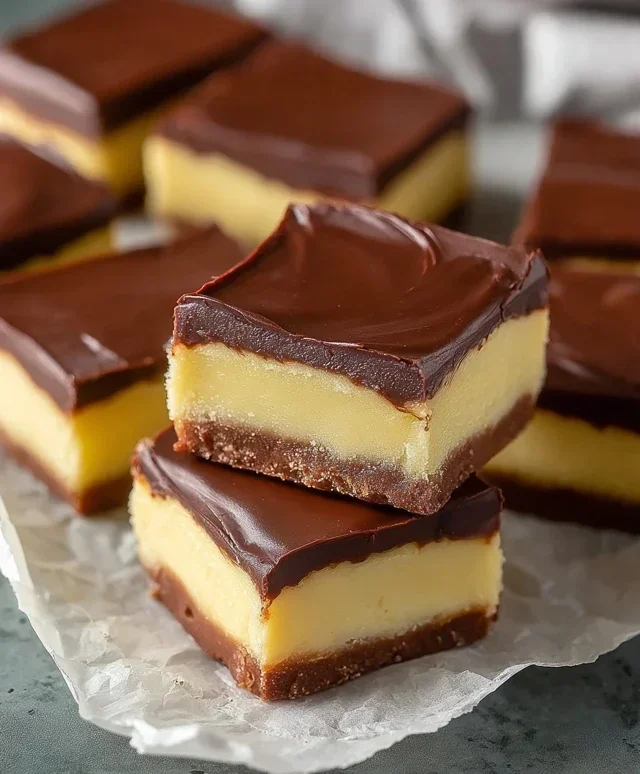
Boston Cream Pie Fudge – Easy Delicious Dessert
Boston Cream Pie Fudge is a delightful and decadent treat that takes the beloved flavors of a classic dessert and transforms them into a chewy, melt-in-your-mouth confection. If you’ve ever found yourself dreaming of that perfect combination of moist cake, luscious pastry cream, and rich chocolate glaze, prepare to have your culinary world rocked. This isn’t just any fudge; it’s an homage to a dessert icon, meticulously crafted to capture every delicious nuance. We love Boston Cream Pie for its comforting familiarity and sophisticated taste, and this Boston Cream Pie Fudge version amplifies that beloved experience into a portable, intensely flavorful bite. What makes it truly special is the clever way we’ve managed to infuse that signature creamy, custardy texture and distinct chocolate finish into a fudge format, making it an irresistible indulgence for any occasion.
Boston Cream Pie Fudge
Get ready to experience a classic dessert reimagin extracted! This Boston Cream Pie Fudge captures all the beloved flavors of the iconic cake – the rich chocolate, the creamy vanilla custard, and that irresistible chocolate glaze – all in a delightful, melt-in-your-mouth fudge. It’s surprisingly easy to make and is sure to become a new favorite for any sweet tooth. Forget the layers of cake and complicated frosting; this fudge delivers all the flavor impact with a fraction of the effort. Perfect for parties, holidays, or just a treat for yourself, this fudge is a guaranteed crowd-pleaser.
Ingredients:
Instructions:
This recipe is divided into two main parts: creating the vanilla custard layer and then the chocolate layer, which will then be swirled together.
Part 1: Creating the Vanilla Custard Fudge Layer
1. Prepare Your Pan: Before you begin extract, line an 8×8 inch baking pan with parchment paper, leaving some overhang on the sides. This overhang will act as handles to easily lift the fudge out of the pan once it’s set. Lightly grease the parchment paper with a bit of cooking spray or butter to ensure no sticking. Set this aside.
2. Melt the Base: In a large, heavy-bottomed saucepan, combine the 2 cups of granulated sugar, 4 oz of cubed unsalted butter, and 1/2 cup of heavy cream. Place the saucepan over medium heat. Stir constantly with a whisk or wooden spoon until the sugar and butter have completely dissolved and the mixture is smooth. It’s crucial to keep stirring to prevent the sugar from scorching on the bottom of the pan.
3. Boil and Cook: Once the sugar and butter are dissolved, bring the mixture to a rolling boil. Now, this is where the magic happens, but it requires careful timing and temperature. You’ll need to let it boil, stirring continuously, for exactly 4 minutes. A candy thermometer is highly recommended here to ensure accuracy. You want to reach a temperature of 235 degrees Fahrenheit (113 degrees Celsius), which is the soft-ball stage. If you don’t have a thermometer, after 4 minutes of boiling, you can test by dropping a small amount of the mixture into a glass of cold water. It should form a soft, pliable ball.
4. Incorporate the Creamy Goodness: After the 4 minutes of boiling, immediately remove the saucepan from the heat. This is very important! You don’t want to overcook it at this stage. Add the 2 cups of white chocolate chips, the entire 7 oz container of marshmallow creme, and the 3 tablespoons of instant vanilla pudding mix to the hot sugar mixture. Stir vigorously with a heat-resistant spatula or wooden spoon. The residual heat will melt the white chocolate chips and the marshmallow creme. Keep stirring until everything is completely smooth, creamy, and homogenous. Then, stir in the 1/2 teaspoon of pure vanilla extract. The pudding mix will help thicken the fudge and give it that classic custard-like texture. Pour about half of this creamy vanilla mixture into your prepared baking pan and spread it evenly.
Part 2: Creating the Chocolate Fudge Layer and Swirling
5. Prepare the Chocolate Mixture: In a separate heatproof bowl, place the 6 oz of semisweet chocolate chips and 1 tablespoon of vegetable oil. Microwave this mixture in 30-second intervals, stirring well after each interval, until the chocolate is melted and smooth. Be careful not to overheat the chocolate, as it can seize up. Alternatively, you can melt the chocolate and oil together in a double boiler over simmering water, stirring constantly until smooth.
6. The Grand Swirl: Now it’s time to bring it all together. You should have about half of the vanilla fudge mixture remaining in the saucepan (or you can make a second batch if you prefer more vanilla). Gently pour or spoon the melted semisweet chocolate mixture over the vanilla fudge layer in the baking pan. Don’t worry about it being perfectly even. Take a knife or a skewer and gently swirl the chocolate into the vanilla layer. Create beautiful marbled patterns, but be careful not to over-swirl, or the colors will blend too much. Aim for distinct streaks of chocolate and vanilla.
7. Chill and Set: Once you’re happy with your swirls, cover the pan loosely with plastic wrap and refrigerate for at least 2-3 hours, or until the fudge is completely firm and set. Patience is key here for the best fudge texture. Once it’s firm, use the parchment paper overhangs to lift the entire block of fudge out of the pan. Place it on a cutting board and cut it into small squares using a sharp knife. For cleaner cuts, you can warm your knife slightly in hot water and dry it before each slice. Store your Boston Cream Pie Fudge in an airtight container at room temperature or in the refrigerator for up to a week. Enjoy every decadent bite!
Conclusion:
This Boston Cream Pie Fudge recipe is an absolute triumph! It masterfully captures the iconic flavors of a classic Boston Cream Pie – rich chocolate, creamy vanilla custard, and a hint of that signature cakey goodness – all condensed into a decadent, melt-in-your-mouth fudge. It’s incredibly satisfying to create something so special at home, and the result is truly show-stopping. This fudge is perfect for gifting, for your next special occasion, or simply for indulgin extractg your sweet cravings. I encourage you to give this recipe a try; you won’t be disappointed by the delightful fusion of flavors and textures. The ease of making this fudge, combined with its incredible taste, makes it a recipe you’ll want to return to again and again.
For serving, consider cutting it into elegant squares and arrangin extractg them on a platter. It’s also wonderful served alongside a cup of coffee or tea, or even as a unique dessert after a meal. For variations, you could experiment by adding a touch of almond extract to the vanilla layer for a different nutty profile, or even swirl in some raspberry jam for a fruity twist. Don’t be afraid to get creative and make this Boston Cream Pie Fudge your own!
Frequently Asked Questions:
Q: Can I make this fudge ahead of time?
Absolutely! This fudge is ideal for making ahead. Once set and cut, it can be stored in an airtight container at room temperature for up to a week. For longer storage, you can refrigerate it.
Q: My fudge seems too soft. What went wrong?
A common reason for soft fudge is not reaching the correct temperature during cooking. Using a candy thermometer is highly recommended to ensure you hit the soft-ball stage. If it’s still too soft after cooling, you might need to slightly increase the cooking time next time. Ensure you’re measuring your ingredients accurately, especially the sugar and butter.
Q: Can I use milk chocolate chips instead of semi-sweet?
Yes, you can certainly experiment with milk chocolate chips! This will result in a sweeter and creamier fudge, with a less intense chocolate flavor compared to using semi-sweet. It’s a great option if you prefer a milder chocolate taste.
Boston Cream Pie Fudge
A decadent fudge capturing the flavors of Boston Cream Pie with layers of creamy white chocolate and rich chocolate.
Ingredients
-
2 cups sugar
-
4 oz unsalted butter
-
1/2 cup heavy cream
-
2 cups white chocolate chips
-
7 oz container of marshmallow creme
-
3 tbsp vanilla pudding
-
1/2 tsp vanilla extract
-
3 tbsp unsweetened cocoa powder
-
6 oz semisweet chocolate chips
-
1 tbsp vegetable oil
Instructions
-
Step 1
Grease and line an 8×8 inch baking pan with parchment paper, leaving an overhang on the sides. -
Step 2
In a heavy-bottomed saucepan, combine sugar, butter, and heavy cream. Cook over medium heat, stirring constantly, until the sugar dissolves and the mixture comes to a boil. Boil for 5 minutes without stirring. -
Step 3
Remove the saucepan from the heat. Stir in the white chocolate chips, marshmallow creme, vanilla pudding, and vanilla extract until smooth and well combined. -
Step 4
Pour half of the white chocolate mixture into the prepared pan and spread evenly. Set aside. -
Step 5
In the same saucepan (no need to wash), combine the semisweet chocolate chips and vegetable oil. Melt over low heat, stirring until smooth. If the mixture is too thick, add a tiny splash of water. -
Step 6
Pour the melted semisweet chocolate mixture over the white chocolate layer in the pan and spread evenly. -
Step 7
Pour the remaining white chocolate mixture over the chocolate layer and swirl gently with a knife for a marbled effect. -
Step 8
Refrigerate for at least 2 hours, or until firm. Cut into squares before serving.
Important Information
Nutrition Facts (Per Serving)
It is important to consider this information as approximate and not to use it as definitive health advice.
Allergy Information
Please check ingredients for potential allergens and consult a health professional if in doubt.