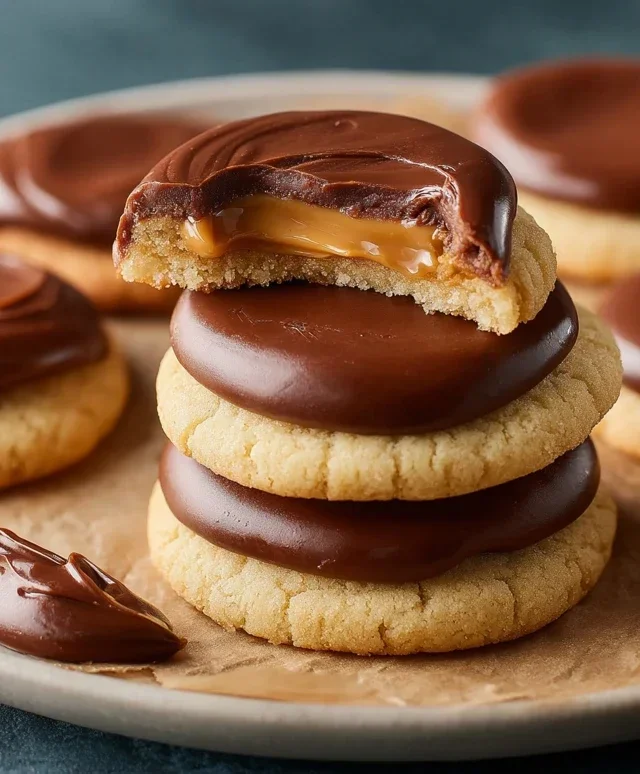
Easy Twix Cookies – Ultimate Caramel Chocolate Treat
Twix Cookies are more than just a treat; they’re a nostalgic journey back to childhood, a delightful crunch that never fails to bring a smile. Who among us hasn’t reached for that iconic candy bar, craving its perfect trifecta of textures and flavors? Well, get ready to recreate that magic in your own kitchen! These Twix Cookies capture the essence of that beloved chocolate, caramel, and shortbread combination, but with a homemade touch that elevates them to a whole new level. We’re talking about a buttery, crum extractbly shortbread base, generously swirled with luscious caramel, and finally enrobed in a rich chocolate coating. It’s that irresistible harmony of chewy, creamy, and crisp that makes these Twix Cookies so incredibly special and universally adored.
Twix Cookies
Get ready to indulge in a truly decadent treat! These Twix cookies are inspired by the beloved candy bar, bringin extractg together a buttery shortbread base, a luscious caramel layer, and a rich chocolate coating. They’re surprisingly easy to make and are sure to become a new favorite for any cookie lover. Imagin extracte that perfect snap of shortbread, followed by the chewy, sweet caramel, all topped off with smooth, melted chocolate. It’s a flavor combination that’s hard to resist. Whether you’re baking for a special occasion or just craving a little sweet escape, these Twix cookies deliver.
Ingredients:
Instructions:
Preparing the Cookie Base:
First, let’s get our cookie dough started. In a large mixing bowl, combine the entire box of white cake mix (that’s 15.25 ounces for you!) with ¾ cup of all-purpose flour. Whisk these dry ingredients together until they are well combined. This ensures that the flour is evenly distributed throughout the cake mix, which will lead to a more consistent texture in our cookies. Next, add 1 cup of softened salted butter to the dry ingredients. It’s important that the butter is softened, not melted. Softened butter will cream together with the dry ingredients much better, creating a dough that is pliable and easy to work with. You can use an electric mixer on low speed to begin extract combining these ingredients, or you can get your hands in there and mix them by hand until the mixture resembles coarse crum extractbs. Continue mixing until a cohesive dough starts to form. It should be slightly crum extractbly but hold together when you squeeze it. Don’t overmix at this stage; we just want everything to come together.
Forming and Baking the Cookie Layers:
Once your cookie dough has formed, it’s time to shape them. I like to use a cookie scoop for this to ensure uniformity, but you can also just use your hands. Roll the dough into small balls, about 1 inch in diameter, and place them about 2 inches apart on a baking sheet lined with parchment paper. Parchment paper is a lifesaver here, preventing sticking and making cleanup a breeze. Now, gently flatten each ball with the palm of your hand or the bottom of a glass. You don’t want them too thin, just a nice, even disc. Preheat your oven to 350 degrees Fahrenheit (175 degrees Celsius). Bake the cookies for 10-12 minutes, or until the edges are lightly golden brown. The centers might still look a little soft, and that’s perfectly fine. They will continue to cook as they cool on the baking sheet. Let the cookies cool on the baking sheet for about 5 minutes before carefully transferring them to a wire rack to cool completely. This cooling period is crucial for the cookies to firm up properly before we add the caramel.
Crafting the Caramel Layer:
While our cookie bases are cooling, let’s prepare the delightful caramel topping. In a small, microwave-safe bowl, combine 1 ¼ cups of caramel bits with 1 Tablespoon of heavy cream. Microwave this mixture in 30-second intervals, stirring well after each interval, until the caramel is completely melted and smooth. Be careful not to overheat the caramel, as it can become too thin and difficult to work with. The heavy cream adds a wonderful richness and helps create a smoother, more pliable caramel. Stir until you have a wonderfully gooey, pourable caramel. If you don’t have a microwave, you can melt the caramel bits and heavy cream in a double boiler over low heat, stirring constantly. Once melted and smooth, let the caramel sit for a minute or two to cool slightly before proceeding. This prevents it from melting the cookie base too much.
Assembling the Twix Cookie Layers:
Now for the fun part – assembling our Twix cookies! Once the cookie bases are completely cool, it’s time to add that luscious caramel. You can either carefully spoon a small amount of the melted caramel onto the top of each cookie, spreading it gently to cover most of the surface, or, for a slightly more even distribution, you can invert the cooled cookie and dip the top into the caramel. I find that a gentle spreading with the back of a spoon works well and gives you good control. Make sure to get the caramel as close to the edges as you can without it dripping off too much. You want a good caramel-to-cookie ratio. Once each cookie has its caramel layer, place them back on the parchment-lined baking sheet. It’s important to let this caramel layer set up a bit before moving on to the chocolate. You can pop them in the refrigerator for about 10-15 minutes to speed this up.
Dipping in Chocolate and Finishing Touches:
The final step is to coat our caramel-topped cookies in delicious chocolate! In a separate microwave-safe bowl, combine 1 cup of semi-sweet chocolate chips (or mini semi-sweet chocolate chips, if you prefer a finer chocolate drizzle) with ½ Tablespoon of salted butter. Microwave this in 30-second intervals, stirring after each, until the chocolate is completely melted and smooth. The addition of butter helps to make the chocolate glossy and easier to dip with. Once the chocolate is melted and smooth, you can begin extract dipping. Carefully dip the caramel-coated side of each cookie into the melted chocolate, allowing any excess to drip back into the bowl. You can use a fork or a dipping tool for this. Alternatively, if dipping seems too messy, you can always drizzle the melted chocolate over the caramel-topped cookies using a spoon or a piping bag. Place the chocolate-covered cookies back onto the parchment-lined baking sheet. You can gently tap the baking sheet on the counter to help smooth out the chocolate if needed. For an extra touch, you can even drizzle a little extra melted chocolate over the top once the initial coating has set slightly. Let the chocolate set completely, either at room temperature or in the refrigerator, before enjoying your homemade Twix cookies. They are best stored in an airtight container at room temperature.

Conclusion:
I truly hope you’ve enjoyed diving into this recipe for Twix cookies! These delightful treats are a fantastic way to bring the beloved candy bar experience into your own kitchen. With their buttery shortbread base, gooey caramel layer, and rich chocolate coating, they’re an absolute crowd-pleaser and perfect for any occasion. Whether you’re baking for a party, a bake snon-alcoholic ale, or just a cozy afternoon treat, these Twix cookies are sure to impress. I encourage you to give this recipe a try; it’s surprisingly straightforward and the results are incredibly rewarding. Imagin extracte the joy of biting into that perfect combination of textures and flavors! They are also wonderful for sharing with friends and family, or for adding a homemade touch to gift baskets.
Looking for ways to mix things up? You can experiment with different types of chocolate for the coating – dark chocolate offers a more intense flavor, while white chocolate provides a sweeter contrast. For an extra layer of decadence, consider adding a sprinkle of sea salt on top of the chocolate before it sets. These cookies are best served at room temperature, but a brief zap in the microwave can re-soften the caramel if they’ve been chilled. They store beautifully in an airtight container for several days, though I doubt they’ll last that long!
Frequently Asked Questions:
Can I make these Twix cookies ahead of time?
Absolutely! These cookies actually benefit from being made a day in advance. This allows the flavors to meld beautifully and ensures the caramel sets up perfectly. Store them in an airtight container at room temperature.
My caramel layer is too runny. What went wrong?
This can happen if the caramel isn’t cooked to the right temperature or if you don’t let it cool sufficiently before adding the chocolate. Ensure your caramel reaches a soft ball stage (around 240°F/115°C) and allow it to cool for at least 10-15 minutes before spreading. Also, make sure the cookies are completely cooled before the chocolate coating step.
Are there any nut-free variations?
Yes! This recipe is naturally nut-free as written. You just need to ensure your chocolate chips and any other ingredients are certified nut-free to be completely safe for those with allergies.
Twix Cookies
Delicious cookies with a chewy caramel center and chocolate coating, inspired by the classic Twix bar.
Ingredients
-
1 box white cake mix (15.25 ounces)
-
¾ cup all-purpose flour
-
1 cup salted butter, softened
-
1 ¼ cups caramel bits
-
1 Tablespoon heavy cream
-
1 cup semi-sweet chocolate chips or mini semi-sweet chocolate chips
-
½ Tablespoon salted butter
Instructions
-
Step 1
Preheat oven to 350°F (175°C). Line baking sheets with parchment paper. -
Step 2
In a large bowl, combine the white cake mix, all-purpose flour, and 1 cup of softened salted butter. Mix until a crumbly dough forms. -
Step 3
Press about half of the dough into the bottom of the prepared baking sheets to form a thin base layer. -
Step 4
In a small microwave-safe bowl, combine the caramel bits and 1 Tablespoon heavy cream. Microwave in 30-second intervals, stirring in between, until melted and smooth. Stir in ½ Tablespoon salted butter. -
Step 5
Spread the melted caramel mixture evenly over the dough base on the baking sheets. -
Step 6
Crumble the remaining dough and sprinkle it evenly over the caramel layer. -
Step 7
Bake for 18-22 minutes, or until golden brown and set. -
Step 8
Let cool on the baking sheets for 10 minutes before transferring to a wire rack to cool completely. -
Step 9
Melt the semi-sweet chocolate chips in a microwave-safe bowl, stirring every 30 seconds until smooth. -
Step 10
Once the cookies are completely cool, drizzle or spread the melted chocolate over the top. Let the chocolate set before cutting into bars.
Important Information
Nutrition Facts (Per Serving)
It is important to consider this information as approximate and not to use it as definitive health advice.
Allergy Information
Please check ingredients for potential allergens and consult a health professional if in doubt.