Salted Brownie Cookies – Rich & Fudgy Treat
Salted brownie cookies are a culinary masterpiece, a decadent fusion that has captured the hearts and taste buds of dessert lovers everywhere. Imagin extracte the rich, fudgy intensity of a perfectly baked brownie, then miniaturized and transformed into a chewy, irresistible cookie form. That’s the magic we’re diving into today! These aren’t just any cookies; they’re an experience. The secret to their universal appeal lies in that beautiful balance: the deep, dark chocolate flavor is perfectly complemented by a sprinkle of flaky sea salt, creating a symphony of sweet and savory that dances on your tongue. We love them because they deliver all the indulgence of a brownie without the fuss, and the subtle salinity elevates them from simply delicious to truly unforgettable. Get ready to bake up a batch of your new favorite treat!

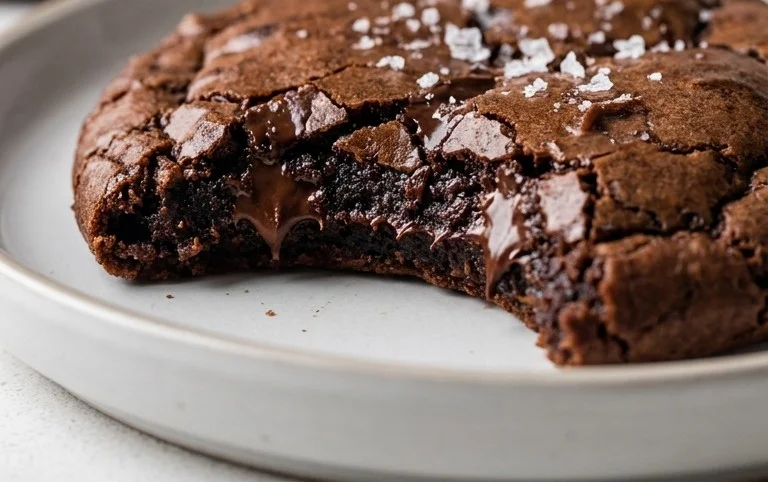
Salted Brownie Cookies
Get ready to experience the ultimate chocolate indulgence with these Salted Brownie Cookies! These aren’t your average cookies; they are rich, fudgy, and intensely chocolatey, all packed into a delightful cookie form with a hint of sea salt to elevate every bite. If you’re a brownie lover, prepare to be obsessed. These cookies achieve that perfect chewy center and slightly crisp edge that makes a brownie so irresistible, but with the convenience and shareability of a cookie. The magic lies in the balance of deep chocolate flavor, the sweetness of the sugar, and that crucial touch of salt that makes all the flavors sing. This recipe is designed to be straightforward, even for begin extractners, and the results are truly spectacular.
Ingredients:
Instructions:
Step 1: Preparing the Dry and Wet Foundations
Begin extract by preheating your oven to 350°F (175°C). Line baking sheets with parchment paper. This is a crucial step to prevent sticking and ensure easy cleanup. In a medium bowl, whisk together the all-purpose flour, baking powder, and 1/8 teaspoon of salt. The baking powder will provide a little lift, but we’re aiming for a dense, chewy cookie, so we don’t want too much. Set this dry mixture aside. In a separate large bowl, whisk together the granulated sugar and the vegetable oil. This combination will help create that wonderfully fudgy texture. Next, add the room-temperature eggs and the extra egg yolk. Room temperature eggs emulsify better, leading to a smoother batter and a more consistent cookie texture. Whisk these in until well combined and the mixture is slightly lighter in color. Stir in the vanilla extract. The vanilla enhances the chocolate flavor beautifully.
Step 2: Melting the Chocolatey Goodness
Now for the star of the show: chocolate! In a heatproof bowl, combine the 6 tablespoons of unsalted butter and 1 cup of semi-sweet chocolate chips. You can melt these together using one of two methods: either over a double boiler (placing the bowl over a saucepan of simmering water, ensuring the bottom of the bowl doesn’t touch the water) or in the microwave. If microwaving, heat in 30-second intervals, stirring well after each interval, until the butter is melted and the chocolate chips are almost completely melted. Stir until the mixture is smooth and glossy. Be careful not to overheat the chocolate, as it can seize up. Once smooth, stir in the unsweetened cocoa powder and the optional espresso powder. The espresso powder is a secret weapon; it doesn’t make the cookies taste like coffee, but it deepens and intensifies the chocolate flavor, adding an extra layer of complexity. Stir this mixture until it’s completely incorporated and you have a rich, dark chocolate base.
Step 3: Combining the Batter for Fudgy Bliss
Gently pour the melted chocolate mixture into the bowl with the sugar and egg mixture. Whisk everything together until it’s just combined. You want to ensure there are no streaks of unincorporated ingredients, but avoid overmixing at this stage. The batter will be thick and glossy. Now, it’s time to incorporate the dry ingredients. Gradually add the flour mixture to the wet ingredients, mixing with a spatula or wooden spoon until just combined. Again, do not overmix. Overmixing can develop the gluten in the flour, resulting in tougher cookies, and we want that soft, chewy texture. Fold in the remaining semi-sweet chocolate chips. These will provide delightful pockets of melted chocolate throughout your cookies.
Step 4: Shaping and Topping Your Brownie Cookies
This is where you’ll start to see your delicious creations take shape. Drop rounded tablespoons of dough onto the prepared baking sheets, leaving about 2 inches between each cookie as they will spread slightly. You can use a cookie scoop for uniform size. For that signature brownie look and texture, gently press down on the top of each dough ball with the back of a spoon or your fingertips. This helps them spread more evenly and achieve that characteristic crinkled top. If you’re feeling fancy, now is the time to add a few extra chocolate chips to the tops of the cookies. And, for the pièce de résistance, lightly sprinkle the tops of the cookies with sea salt flakes. This is entirely optional but highly recommended! The sea salt provides a beautiful contrast to the sweetness and richness of the chocolate, creating that irresistible “salted caramel” type of flavor profile that just makes your taste buds sing.
Step 5: Baking to Perfection
Bake the cookies for 9 to 12 minutes. The exact baking time will depend on your oven and how large you made your cookies. You’re looking for the edges to be set and slightly firm, while the centers should still look a little soft and underbaked. This is key to achieving that chewy, fudgy interior. Overbaked cookies will be dry and cakey, which is not what we’re going for here. Once they’re out of the oven, let the cookies cool on the baking sheets for about 5 to 10 minutes before transferring them to a wire rack to cool completely. This allows them to set up properly. The residual heat will continue to cook the centers slightly, ensuring that perfect fudgy texture.
Enjoy these Salted Brownie Cookies warm with a glass of milk, or let them cool completely for a more structured, yet still wonderfully chewy, treat. They are also fantastic for gifting!
Conclusion:
I hope you’ve enjoyed learning how to make these absolutely divine Salted Brownie Cookies! This recipe is a true winner because it perfectly balances the rich, fudgy interior of a brownie with the satisfying chew of a cookie, all elevated by that delightful sprinkle of flaky sea salt. They’re incredibly versatile, making them perfect for any occasion, from a simple afternoon treat to a show-stopping dessert at a party. I truly encourage you to give these a try – you won’t be disappointed!
For serving, I love them warm, fresh out of the oven, perhaps with a scoop of vanilla bean ice cream for an ultimate indulgence. They’re also fantastic cooled and enjoyed with a glass of cold milk. If you’re feeling adventurous, consider adding a handful of chopped pecans or walnuts to the dough for an extra textural crunch, or even a swirl of caramel for another layer of flavor. Experiment and find your perfect variation!
Frequently Asked Questions:
Why are my Salted Brownie Cookies not fudgy enough?
To ensure a fudgy texture, make sure you are not overbaking them. They should look slightly underdone in the center when you take them out of the oven, as they will continue to cook on the baking sheet. Also, using good quality chocolate and butter is key to achieving that rich, fudgy interior.
Can I make these cookies ahead of time?
Absolutely! You can bake the cookies and store them in an airtight container at room temperature for up to 3-4 days. They actually tend to get even chewier and more delicious as they sit. You can also freeze baked cookies for longer storage, or even freeze the dough balls before baking.
What kind of salt should I use for the topping?
Flaky sea salt is highly recommended for the best results. Brands like Maldon or Jacobsen’s are excellent choices. The larger flakes provide a pleasant textural contrast and a burst of savory flavor that beautifully complements the sweetness of the cookie.
Salted Brownie Cookies
Decadent brownie cookies with a chewy center, crisp edges, and a sprinkle of sea salt for the perfect balance of sweet and salty.
Ingredients
-
1 cup All-Purpose Flour
-
1 tsp Baking Powder
-
1/8 tsp Salt
-
2 Large Eggs (room temperature)
-
1 Large Egg Yolk (room temperature)
-
1 cup Granulated Sugar
-
1 tbsp Vegetable Oil
-
1 tsp Vanilla Extract
-
6 tbsp Unsalted Butter, melted
-
1 cup Semi-Sweet Chocolate Chips, plus some for topping cookies
-
1/4 cup Unsweetened Cocoa Powder
-
1 tsp Espresso Powder (optional)
-
Sea Salt Flakes (for topping cookies (optional garnish))
Instructions
-
Step 1
In a medium bowl, whisk together the all-purpose flour, baking powder, and 1/8 tsp salt. Set aside. -
Step 2
In a large bowl, whisk together the granulated sugar, vegetable oil, vanilla extract, and melted unsalted butter until well combined. Beat in the 2 large eggs and 1 egg yolk one at a time until the mixture is smooth and glossy. -
Step 3
Stir in the unsweetened cocoa powder and espresso powder (if using) until just incorporated. -
Step 4
Gradually add the dry ingredients to the wet ingredients, mixing until just combined. Do not overmix. Fold in the semi-sweet chocolate chips. -
Step 5
Drop rounded tablespoons of dough onto baking sheets lined with parchment paper, leaving about 2 inches between cookies. Press a few extra chocolate chips onto the tops of the cookies. -
Step 6
Bake in a preheated oven at 350°F (175°C) for 9-11 minutes, or until the edges are set and the centers are still slightly soft. The cookies will continue to cook as they cool. -
Step 7
Immediately sprinkle the cookies with sea salt flakes (if using) before they cool completely. -
Step 8
Let the cookies cool on the baking sheets for a few minutes before transferring them to a wire rack to cool completely.
Important Information
Nutrition Facts (Per Serving)
It is important to consider this information as approximate and not to use it as definitive health advice.
Allergy Information
Please check ingredients for potential allergens and consult a health professional if in doubt.